3D Printing with Liquid, Sand, and Metal

3D printers can make a lot of things, but they are also greatly limited by the materials they use. Of course, clever makers are finding ways of combining other materials and off-the-shelf parts to offer the best of both worlds: rapid production of complex printed parts and greater strength, consistency, and/or cost savings by using things you can get at the local hardware store.
In general, hybrid 3D printed objects neatly separate the part into discrete components. For example, to combine a steel machine bolt with a printed part, makers often create a pocket in the shape of the hex nut and then press it in (or even hot-insert it for a better fit). this approach is ultra powerful, and it's the same thing you see on some of the high-end maker printers (like in the TAZ production docs that describe how to use strong/precise steel parts combined together with 3D printed parts).
But the componentized way of combining materials is just one way to create hybrid parts. What about parts that want to be fully encapsulated so they can't come apart? How about adding materials that aren't rigid, like sand or water? Or perhaps parts that are constrained by each other, but not firmly connected?
One of the great things about maker-style 3D printers is that you can access the print bed while they're printing. There are hot elements, electronics, and rapidly moving parts, so BE CAREFUL. That said, their open designs mean you can pause a print mid-way and hack not only the printer itself, but also the final outcome of the printed part.
Hack #1 - Printing with Liquid
Spilling liquid on a 3D printer can toast it, so it's a good idea to take some precautions. Have some paper towels handy. If you see a slow leak, you can just put a paper towel in the way to protect the sensitive parts of the printer. You can also build a dam around your part with modeling clay before filling it just in case the print has a hole and things get wet in a hurry.
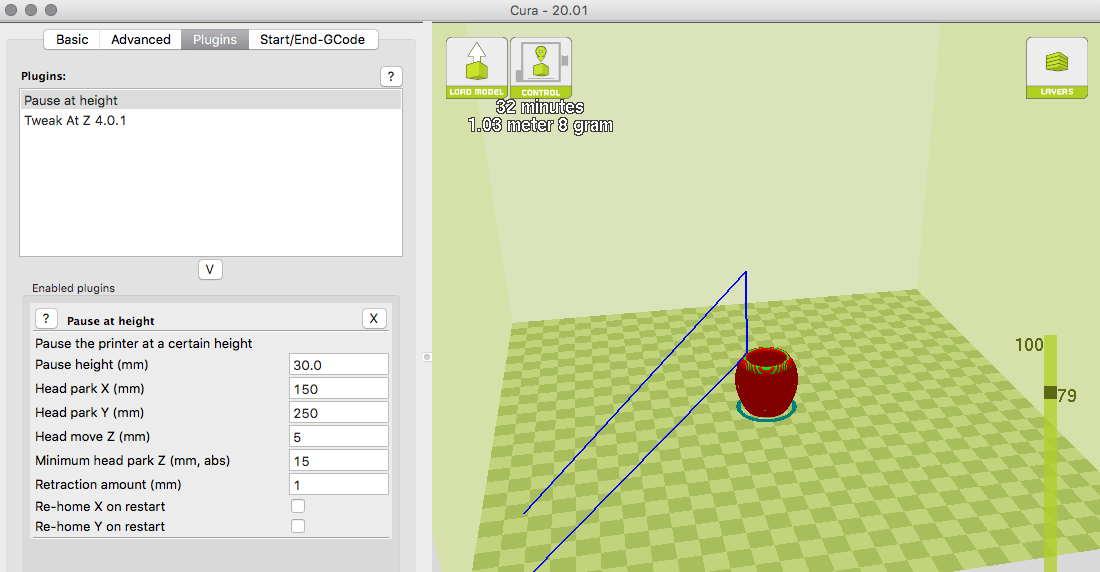
Also note that when you manually pause the printer, it may leave a mark on the print, and in some cases even weaken/break the wall where it is currently resting. For this reason, you'll want to be at the ready and spend as little time as possible actually filling your part with liquid. Alternatively, you can pre-program the printer to pause at a certain height/layer; this retracts the print head and produces a much cleaner and stronger print than manually pausing.
Making A Can Chiller
We decided to make a liquid-filled can chiller (see the can chiller files on Thingiverse). One additional consideration was to use a liquid that would't turn solid in the freezer (thus expanding and likely breaking one of the walls). There are some nasty things you can use to limit freezing, but we wanted to stay food-safe and simple, and fortunately that's pretty easy with salt water.
To make concentrated salt water, just use about 23 grams of salt and 77 grams of water. Then stir like crazy until it completely disolves. This should bring the freezing temperature of the water down to around -21°C which is likely much colder than your freezer goes. We also added a couple drops of blue food coloring so we could see if anything leaked or spilled.
Issue 1 - Filling
3D printers are expensive and have lots of sensitive parts and surfaces that can be damaged by liquids. Even cold water spilled on a heated glass bed could crack it beyond repair. That means you'll want to fill your part via some kind of precise tube. We used a straw at first, then found a small squeeze bottle that gave even more control.
Issue 2 - Sloshing
Watch any 3D printer and you'll see just how quickly the part can zip around. When it's filled with liquid those rapid movements can lead to spillage. Leave ample room near the top of your print to make sure liquid doesn't splash overboard.
More than just a mess, the real issue with sloshing is that a drop of liquid could quickly cool the part's surface and keep the next layer from bonding properly, essentially ruining your print.
Issue 3 - Bed temperature
Be mindful of the chemistry and physics of what you're doing. Some plastics need the bed heated at temperatures above boiling (100C), so naturally, if you decide to fill it with water it will boil. Steam in your machine is never a good thing, so look for something else to use as a liquid. And stay away from any liquid that may be flammable (the extruder gets really hot and has electronics in it). While a spark is unlikely, combustion is always a possibility (especially at elevated temperatures)!
Issue 4 - Leaking
While our 3D printer feels rock solid, it's common that each print will have minor variations due to room temp, humidity, and slight differences in the filament itself. Thin solid walls can often have hairline gaps in places, and those show up as small leaks once there is liquid inside. These seem to be more pronounced as a cavity is being closed since the temperature can be quite warm and the stresses are fairly high as the wall is being jiggled back and forth with molten plastic pulled across the top.
We experienced 3-4 pinhole leaks with our test print. We patched them with hot glue, and it seems to be holding well enough to put in the freezer and give it a try.
Another area for further investigation would be to play with the viscosity of the liquid, making it thicker so it's less likely to find its way through the cracks.
Hack #2 - Printing with Sand
3D parts feel light and plasticy; that's by design since using less material means saving time and money for each printed part. But sometimes you want a little heft to the object you're creating.
We decided to try adding sand because it's heavy, cheap, and easy to find. Not only can it be used to make noise, like in the rattle we printed, but it can also serve as a simple way to weight the bottom of otherwise lightweight objects (like a pencil holder or bowl).
Making a Maraca

To see how sand behaves when fully enclosed in a 3D print, we made a simple maraca (see the maraca files on Thingiverse). As with the liquid filled can chiller, the process was pretty straightforward: just print up to a certain height, pause the printer, add sand, then resume.
Overall the results are pretty much as expected, except for a prominent line between the layers where the print was paused/resumed.
Issue 1 - Shrinkage
The line between the pause/resume point in the print was emphasized due to the part cooling as it was filled with sand. This can be aided by both pre-heating the sand (just lay it on the bed to come up to temp) and minimizing the filling time (the first print we made had an extra-long pause because we were taking pictures of the process).
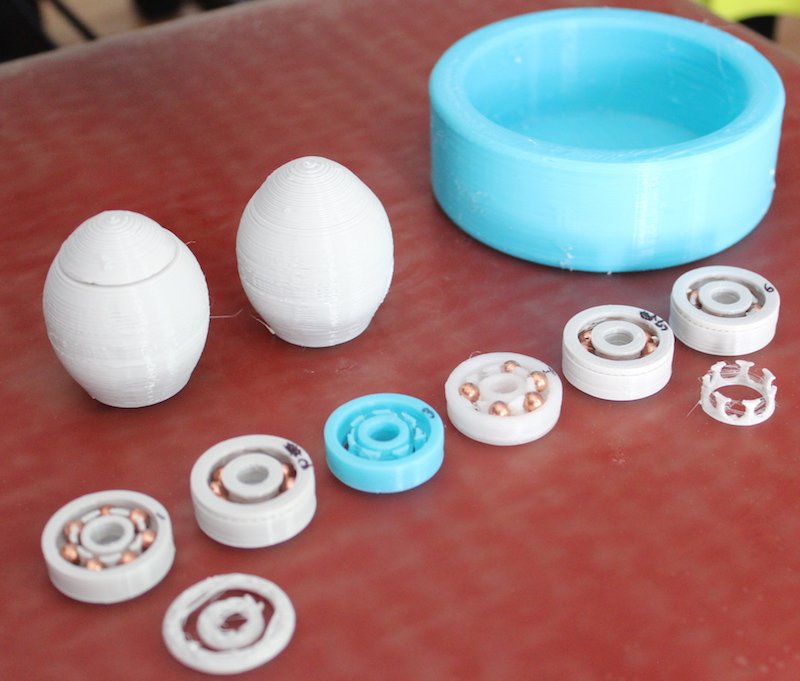
The difference between using room temperature sand and pre-heated sand is pretty significant in terms of shrinkage due to cooling. The second maraca we made (right) is much more structurally sound due to pre-heating and minimzing fill time.
Hack #3 - Printing with Metal
Many commercial 3D printers have popularized the idea that making ball bearings on a 3D printer is the coolest thing you can do. And it is pretty awesome in theory to build a part on a 3D printer that a) doesn't have any mechanical fasteners and b) contains moving parts that actually work.
But the majority of ball bearing prints are really just intended to be a fun exercise to show off the resolution and capabilities of a printer. Powder printers are especially good at this, but since the bearings are made of fused powder, it's mainly a looks-like model that quickly breaks under load.
Similarly, maker-style 3D printers (more formally known as FDM printers) that fuse together layers of plastic don't have a good way to make really precise small spheres, and getting a part to float in another can be super tricky (thinly connected and then broken off) and/or labor intensive (washing support material out with a circulating acid bath).
3D printers can print really hard plastics; that's no problem. But printing spherical plastic parts that roll smoothly against one another and hold up with use is a different story.
Making Ball Bearings
We carefully designed a bearing that could be paused mid-print so we could insert little metal balls ($0.02 worth of BBs) for smooth rotating parts (ball bearing files on Thingiverse). These clearly aren't heavy-duty parts, but they function in a way that's far more robust and useful than a generic demo part.
And with the mass of the metal BBs, they even continue to smoothly glide a bit when you spin them.
Issue 1 - Precision
Making a nice ball bearing requires tight tolerances. 3D printers are very precise little machines, but there's wiggle room depending on which material you're using, how fast you print, and how well calibrated you machine is.
That means a lot of trial and error, creating offsets in the dimensions for the CAD model so that when the part prints it will ultimately be the intended size.
We tried a lot of different filament types, but for making really small parts that don't shrink much as they cool, we settled on using nGen for our final design. Most of the other materials seem feasible (especially if you decide not to use a bearing cage) but require re-tweaking the design for proper fit.
Issue 2 - Layer Adhesion
Most 3D printers come with pretty nice default settings for common filament types to produce nice looking prints. But with the addition of a pause/resume command, getting the layer before and the layer after to form a strong bond is incredibly difficult.
For those with a steady hand and a careful eye, there's one last trick we stumbled upon that seemed to produce the best results. Instead of pausing the print, just watch it carefully and when the Z height is where you want it, slow the machine's feed rate down drastically (around 10%-20% of normal speed) and add the secondary components while it's still running. This is a nerve racking approach and obviously a bit dangerous, so exercise caution.
On the upside, the slow-down technique produces some incredible looking parts where the insertion layer looks like all the others with the expected bonding properties.
For the ball bearing, we decided to not use the cage (the thin piece around the BBs to keep them evenly spaced) when working with the non-paused approach. That makes room for 9 balls instead of 7, and the rolling characteristcs are at least as good as the bearing with the cage due to the increased strength and smoothness when not pausing the print.
All hacks posted by Makefast Workshop are open source and shared without any strings attached for your amusement, use, and continued experimentation.
Happy hacking!