MaxSus: A Minimalist Guitar with Maximum Sustain
Note: If you just want to make your own MaxSus guitar, skip ahead to the build instructions.
Background
Wouldn't it be cool if you could just 3D print an entire guitar? Actually, you already can (minus the strings and tuners), but printed parts alone sound, feel, and play like, well... plastic.
Consider any well designed product that uses 3D printed parts in some form and you'll notice that the smart way to go is almost always a hybrid solution that combines custom printed parts with other standardized components. Naturally, each material has different properties and depending on what a component's primary purpose is, the best material, shape, and fabrication method changes.
The hallmark of the hybrid approach is often found in 3D printers themselves. Take a close look at any major kit printer and you'll notice just how much time and effort has gone into integrating off-the-shelf nuts, bolts, shafts, motors, bearings, guides, wires, and electronics into printed parts.
While machining complex parts often adds considerable cost and manufacturing time, printing complex parts adds relatively little overhead (thus making it worth the extra time and forethought to design around integrating other parts when they are beneficial).
For example, being able to print threaded nuts and bolts is a great test for the resolution and tolerances of a printer, but it's cheaper, stronger, faster, and easier to use metal nuts and bolts directly. Integrating metal hardware into a printed part (usually with various pockets, holes, or slots to retain them) takes a bit of time to learn, but it's an important skill to master as you bring your printed projects to the next level.
Design Goals
We love musical instruments. One idea that we've been thinking about involves re-imagining the electric guitar to:
- maximize sustain (how long a string continues to vibrate after it has been plucked),
- tune it up an octave (reduces windowing latency for analysis, since that often is based on
N*cycles of the lowest note), and - be sure it will hold its tuning over time (reducing the player's need to frequently adjust for changes in temperature and humidity).
Maximizing Sustain
To increase the guitar's sustain, we want to minimize any damping effects that the instrument (body, neck, nut, bridge, frets, etc.) has on the strings as they vibrate.
Any decent nut, bridge, or fret is designed to minimize damping so that a clean tone is produced; they're typically made of metal, bone, or hard plastic for exactly this purpose. As such, they aren't likely to be the main damping element in the system.
The neck and the body are a different story when it comes to sustain. Since they are often made out of wood, the specific type of wood, how it's cut, and where it's glued can have a profound impact on how it sounds (read: which frequencies are damped, resulting in a unique tone). While solid metal guitar necks do exist (like these aluminum necks for $750+), they are prohibitively expensive. And since modern guitar necks have integrated truss rods (a metal screw along their length to allow players to adjust stiffness), using any rigid, off-the-shelf guitar neck seems like a reasonable starting point.
The body of the guitar is another story; it's often large, heavy, and dense (made of maple, basswood, mahogany, ash, walnut, etc.) to give the instrument a solid feel and provide structural attachment points for the neck and bridge to keep everything in tune. But those same properties of wood dampen vibrations much more than other non-wooden materials. Using a minimal metal channel to support the neck and bridge is a sensible alternative to greatly reduce the body's damping effect and address our first design goal.
Tuning Up an Octave
To tune the guitar up an octave, we could simply use lighter strings. This is commonly done on the secondary strings of a 12-string guitar. But there's a major catch.
Consider the string vibration frequency equation as we did previously with the TuneFast Harp:
This equation shows that the frequency (
For our purposes, the big takeaway here is that if the string has uniform density (most strings do) and the length is fixed (as it is for tuning in the open position), to tune a string up an octave (
A typical high E string is on the order of 0.010 inches in diameter, so to reduce the cross sectional area by a factor of 4 (thus reducing its density by the same amount), we'd need a string with a diameter of about 0.005 inches. But guitar strings only go down to about 0.008 inches... Why? Because strings that small start to work like a cheese slicer on your fingers and easily break with use (doubly hazardous, since the end of a wire that small also behaves much like a needle).
As you can imagine, thinner strings also break more easily under the same amount of tension (i.e. they're not as strong). So even if a player was okay using a super thin string and risking a cut, tightening it up to the same tension may cause it to snap.
Going back to the secondary strings of a 12-string guitar, the highest 2 strings are actually tuned in unison with the primary strings (i.e. not an octave higher). This trade-off tunes most of the strings up an octave without pushing the limits of physics or hurting musicians with the high notes.
This method of tuning the 4 lowest strings up an octave, while leaving the highest 2 strings tuned normally, is called Nashville Tuning, and it's a simple way to achieve our second design goal (reduce windowing latency for analysis, based on
Holding Tune
Most reputable guitars hold their tuning well over time when kept in a controlled environment. But no matter how sophisticated the tuning system, using large amounts of wood (particularly in the body) makes most guitars susceptible to minor swelling and shrinking as the humidity and temperature change.
Using a simple metal frame as the body to connect the neck to the bridge is an easy way to greatly reduce environmental effects on the guitar's tuning over time. This further supports the proposed metal U-channel body (used to maximize sustain) to also address the third design goal.
Of course, the guitar will still need to be re-tuned occasionally as the strings wear. But reducing the tuning burden even a little bit can make for a more enjoyable experience overall.
The MaxSus Guitar

Given the design goals and analysis, we decided on:
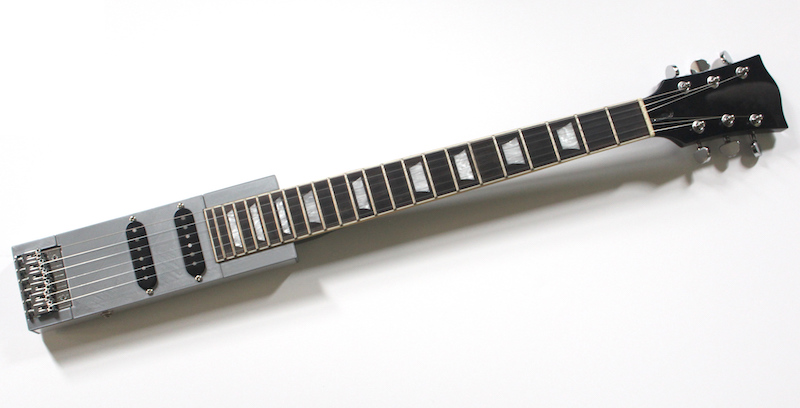
- Using standard tuners, bridge, and a stiff bolt-on guitar neck with integrated nut.
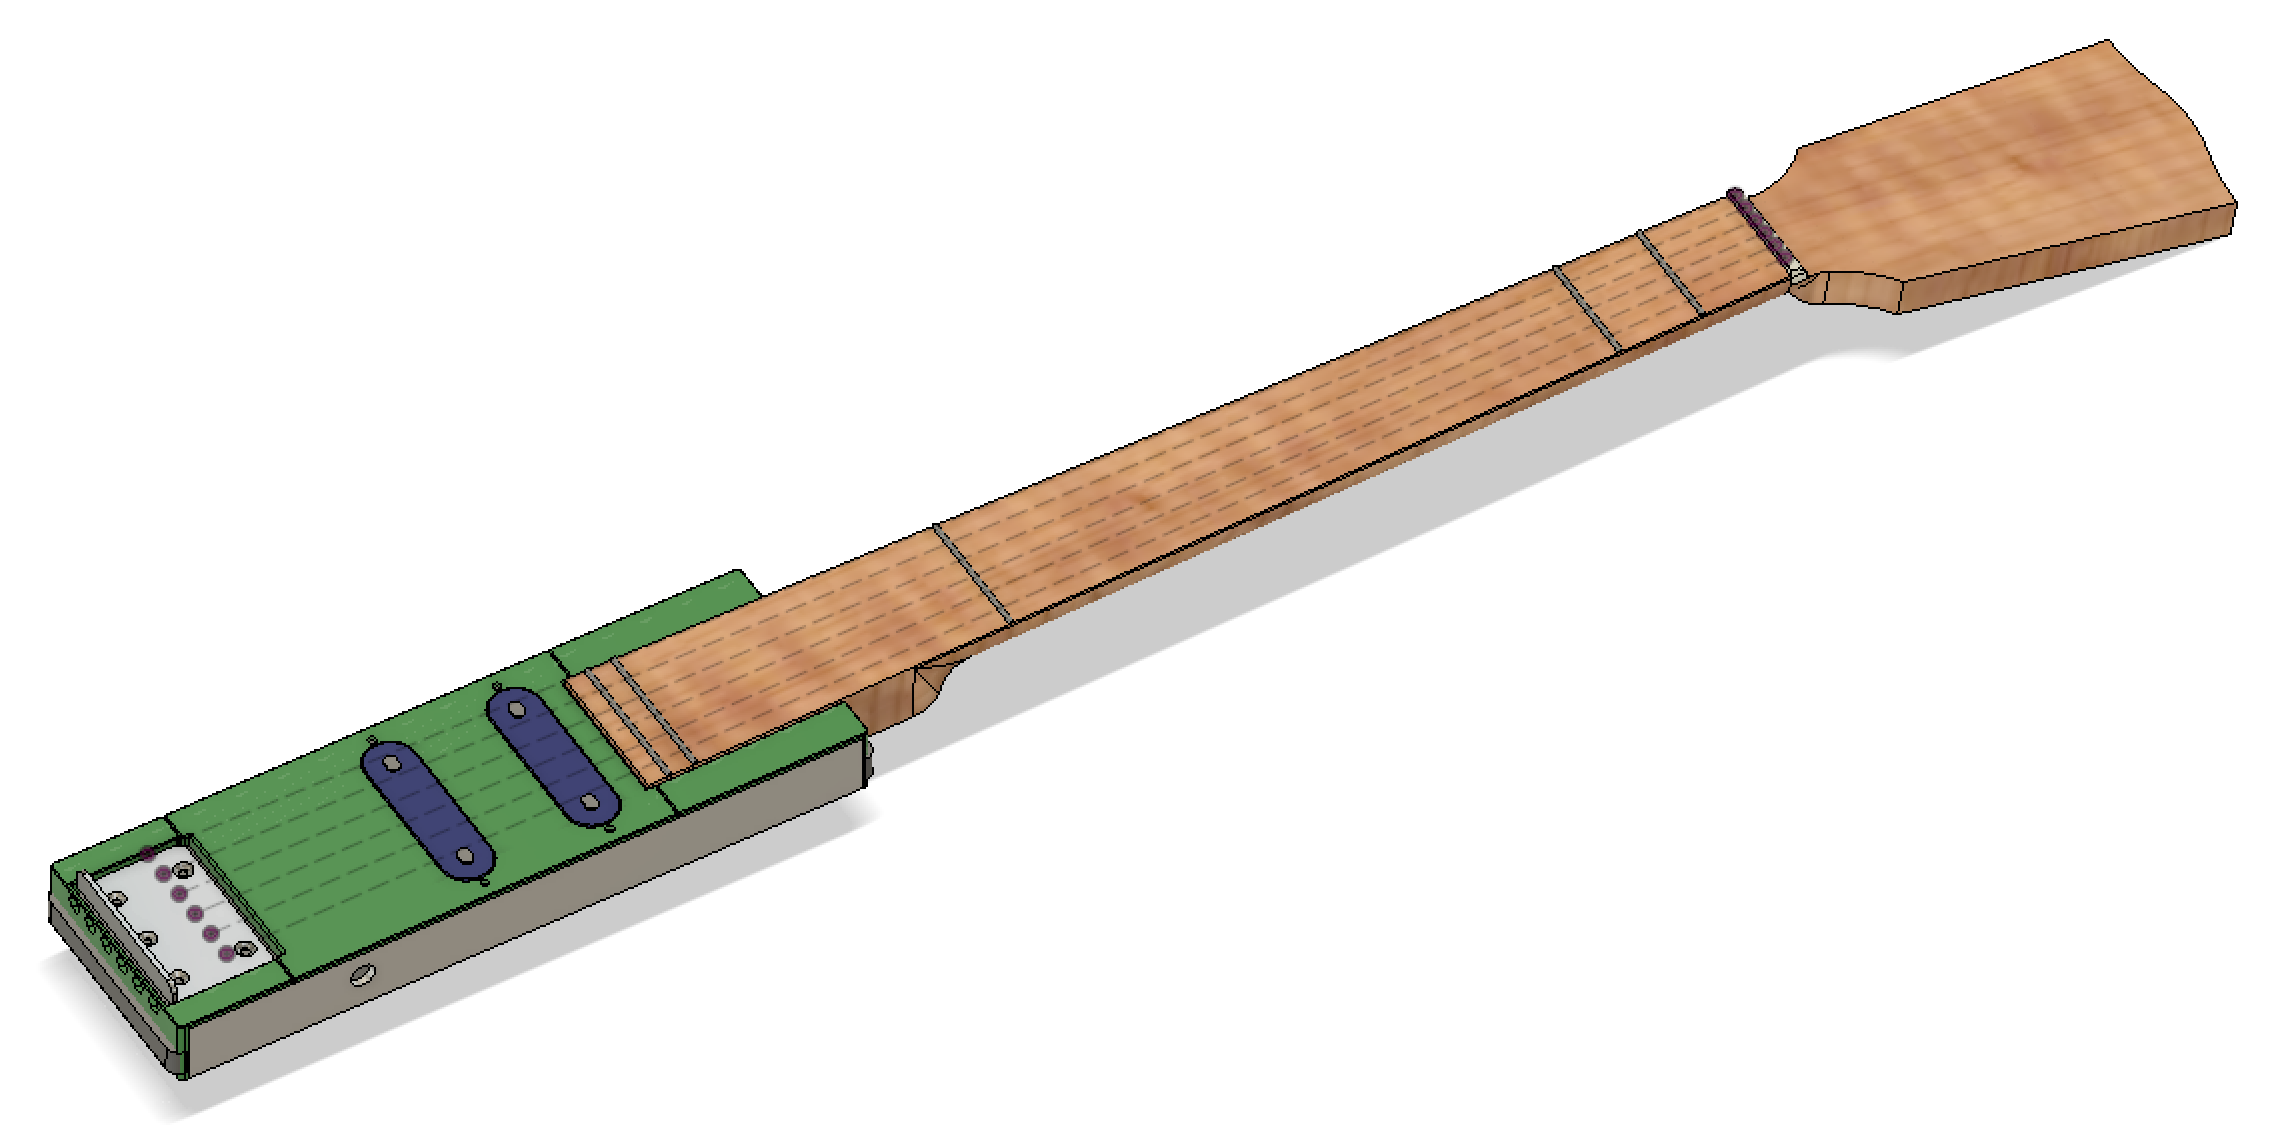
- Making the body of the guitar sturdy and minimal by using a metal U-channel (just wide enough to squeeze in a couple of pickups).
- Using Nashville Tuning (lowest 4 strings tuned up an octave).
So where does 3D printing fit into all of this? Well, there are two major elements of the guitar that can leverage the high precision and complex geometries of printing without requiring the other critical structural functions of dedicated components.
- Positioning/drill templates: Alignment and spacing makes all the differences when building an instrument. By creating precision guides, we can know exactly how things should be placed and drill mating pieces in the right spot to ensure everything is where it should be.
- Non-structural placement/finishing: The pickups need to be held in place and correctly positioned. There are also rough edges from the metal body that can be smoothed with printed parts so there aren't any sharp corners.
Building the MaxSus

The MaxSus guitar uses many off-the-shelf components. You can swap out most of the parts for something that's more to your liking (i.e. different tone, color, style, price-range, etc.), making changes to the CAD files (f3d,step) accordingly:
- A stiff, bolt-on electric guitar neck (like this 24.72" scale Kmise Les Paul Replacement neck)
- Tuners to use on the neck (we used these Machine Head Tuners, but needed to drill holes slightly larger than what was in the neck's headstock to fit)
- Single coil pickups (there are lots to choose from, like this cheap Set of Single Coil Pickups; you could modify the design to use a humbucker if desired)
- A fixed bridge (like this 65MM Metal Fixed Bridge)
- Electric guitar strings to match your desired tuning (since we chose Nashville tuning, these High-strung D’Addario XL are great, or just pick strings from your spares if you have some)
- 4 x (#8 x 1" long) wood screws (or sheet metal screws if you can't find them) to secure the neck to the body, ideally stainless steel and with an oval Phillips head
- 5 x (#6 x 1.25" long) bolts and Nyloc nuts to secure the bridge and bridge spacer to the body, ideally stainless steal and with an oval Phillips head
- A 1/4" audio jack for the pickup's audio output.
Additionally, you'll need to build some parts:
- 10.585" long piece of aluminum U-channel (1/8" Wall Thickness, 1" High x 3-1/2" Wide, comes in 4 foot lengths on McMaster-Carr here, cut to length)
- 2.5" long piece of solid rectangular aluminum to support the bridge (3/4" Thick x 1-3/4" Wide, on McMaster here)
- 3D-Printed drill templates (STL files here: NeckTemplate, BridgeTemplate)
- 3D-Printed faceplates to hold the pickups in place and smooth corners (STL files here: TopMiddleDualPickups, TopBridge, TopNeckL, TopNeckR).
After all pieces are printed and cut to length (there are only two cuts to make, so a hacksaw is adequate here), file down any rough edges. If everything is sized correctly, it should fit together as shown.
Next, mark the center of each hole with an auto punch (or just use a nail and hammer if you don't have one). This is important so that the drill bit won't wobble around when you go to make the holes in the next step.
Also note that you should mark the underside of the bridge spacer (short aluminum rectangle).
Drill all metal parts using a 3/16" drill bit (start with a smaller pilot hole, ~1/8", then go back through with the final size).
Next, place the neck into the template and mark the holes from the back as shown. You can use an auto punch on the wood, but it may chip your finish (twist a small drill bit instead if you want to be safe).
Now, using a 7/64" drill bit, carefully drill the holes into the neck, being very careful not to drill all the way through! Measure and mark the maximum drill depth (with a bit of a safety margin) using a piece of tape on the bit.
Make sure all the holes line up nicely, then carefully attach the neck and the bridge/spacer to the aluminum U-channel body. To ensure alignment before final tightening, you can pull a string between the nut and the bridge and adjust the bridge slightly so everything is exactly where it should be.
Add the tuners and string it up. You MaxSus Guitar is ready to try out!
To finish the guitar, we'll add the pickups. Drill a hole in the side of the guitar where the 1/4" audio jack will go (typically 3/8", but double check based on which jack you're using).
Install the pickups (you may need to slightly file down the sides to fit within the aluminum channel depending on the pickups you're using) and wire everything up (parallel is most common, but feel free to experiment to play with different tones).
And since the ground wire of the pickup is connected directly to the sleeve of the jack, the entire aluminum guitar body is nicely grounded to reduce noise/hum.
Loosen the strings (or fully remove them if you prefer) and carefully press the top pieces into place. If anything is a bit loose or seems like it could rattle, add a strip of tape to the inside of the printed part as needed. Everything should press-fit together tightly.
Voilà! Now plug it in and have some fun (video at the top if you haven't seen it yet).
Comparing Sustain

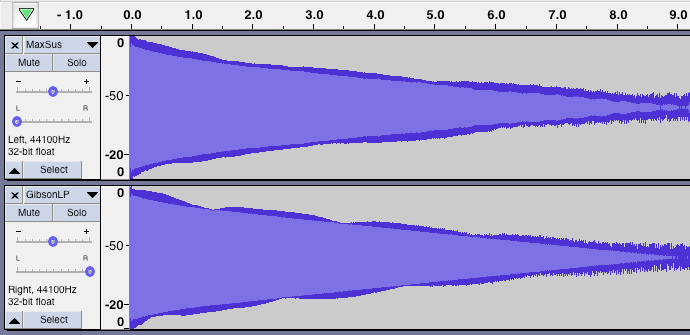
To compare the relative sustain to a production instrument, we plucked the high E string of both a Gibson Les Paul Special and the MaxSus and recorded them. Then we converted the visual scale to dB to more closely approximate how our ears perceive sound and placed them next to each other.
You can see that both guitars have a very nice sustain; the high E string continues to audibly sound for about 9 seconds. The MaxSus can really hold its own (keep in mind there's no compression here). If anything, the MaxSus produces slightly better sustain than the Gibson, which is a pretty major win at about 1/8th the cost (and with cheap pickups to boot).
Onwards
This was just a quick project to make an experimental, hackable guitar with professional sustain in a minimalist package.
It worked surprisingly well, so we're hopeful it can be a springboard for others who enjoy building new instruments and tinkering with sound.
Feel free to share feedback about the MaxSus Guitar on Thingiverse if you have any questions or suggestions.
All hacks posted by Makefast Workshop are open source and shared without any strings attached for your amusement, use, and continued experimentation.
Happy hacking!