Firo4 Guide Book

This guide will walk you through all of Firo4's capabilities so you can get started making music.
CONTENTS
- Overview
- Getting Started / Walkthrough
- Basic Layout / Info Overlay
- Playing Chords
- Playing Notes
- Playing Drums
- Multi-channel Looper
- Analog Looping
- Chord Automation
- Importing SoundFonts
- Audio Sample Override
- Recording Your Session
- Preview / Share Sessions
- Saving / Loading State
- Sync / Download to Computer
- Connecting via MIDI / Audiobus / IAA
- Expert MIDI Controls
- Feeling Musically Stuck?
- Questions and Comments
OVERVIEW
Firo4 is the latest version of Firo, a cutting-edge audio sketchpad designed to turn ideas into music, lickety-split.
Create songs, riffs, and compositions with an instrument designed from the ground up to bring your musical ideas to life without slowing you down.
Note that the classroom edition (Firo4 CE) includes the same basic features as Firo4, but is intended to function as a stand-alone instrument with a brighter interface. Specifically, Firo4 CE doesn't support MIDI, Audiobus, or IAA routing to other apps.
Firo (short for Fiddlewax Pro) was first released in October 2014. Since its humble beginnings, Firo has been download hundreds of thousands of times. We hope you'll give it a try and let us know what you think.
GETTING STARTED / WALKTHROUGH
If you're just getting started and want to see how it all works, watch the original walkthough video below.
BASIC LAYOUT / INFO OVERLAY
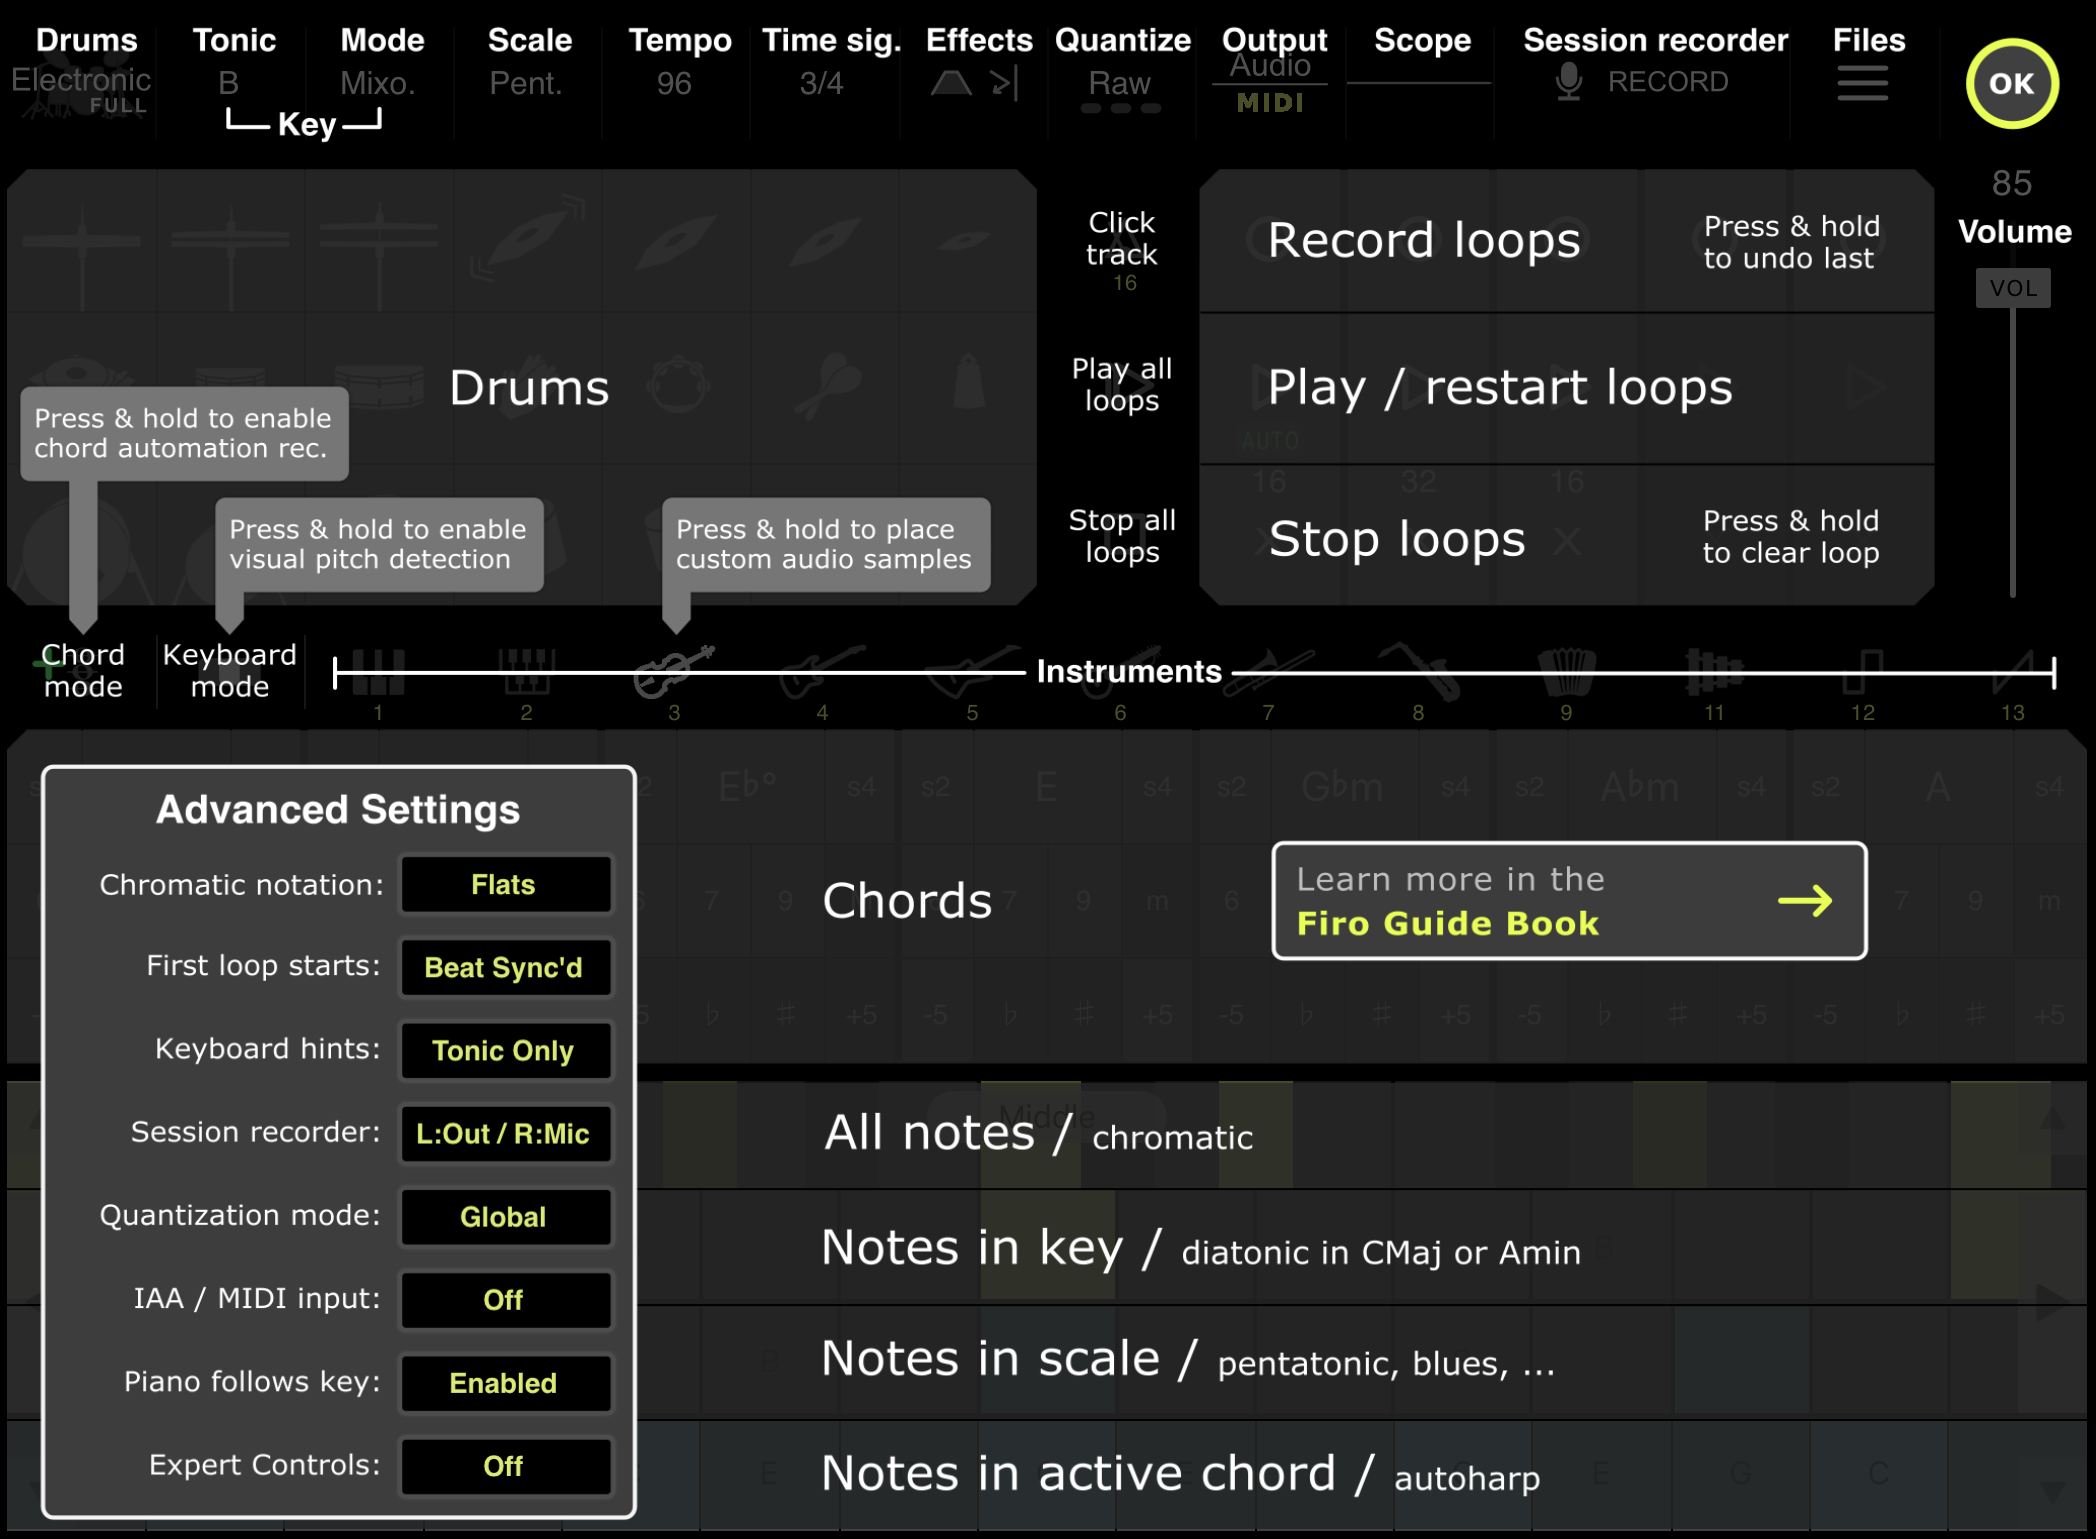
The first place to learn about Firo4 is the information overlay.
To view it, simply tap the info button (circle with an "i" in the center) at the top right corner of the instrument.
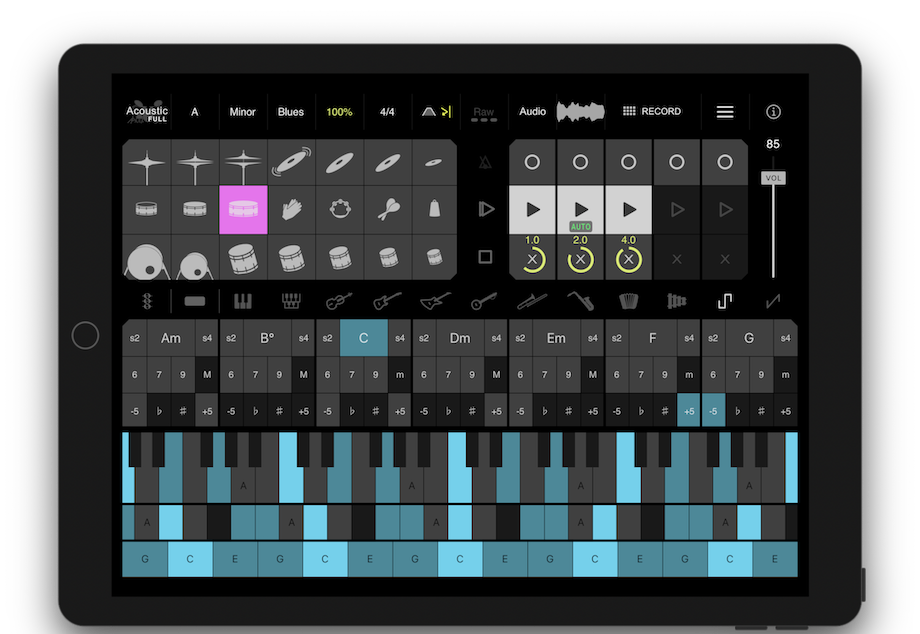
The instrument's interface is neatly divided into four major regions.
- Parameters: The top row contains elements that let you adjust instrument parameters while you play (like key, tempo, time signature, quantization, drumkit, effects, and files).
- Notes: The bottom half is a tonal interface that enables you to select pitched instruments (such as the piano, organ, bass/guitar, electric guitar, sitar, trombone, etc.) and play both melodies and harmonies. All chords and notes respond to how close to the center you touch them.
- Beats: Between the Parameters and Notes, on the left half is a set of pads for playing drum kits and samples. All drum pads respond to how close to the center you touch them.
- Loops: Between the Parameters and Notes, on the right side is a five-channel, auto-expanding, synchronized looper for layering musical phrases together in realtime.
When you're done, press OK in the top right corner to return to the instrument.
PLAYING CHORDS
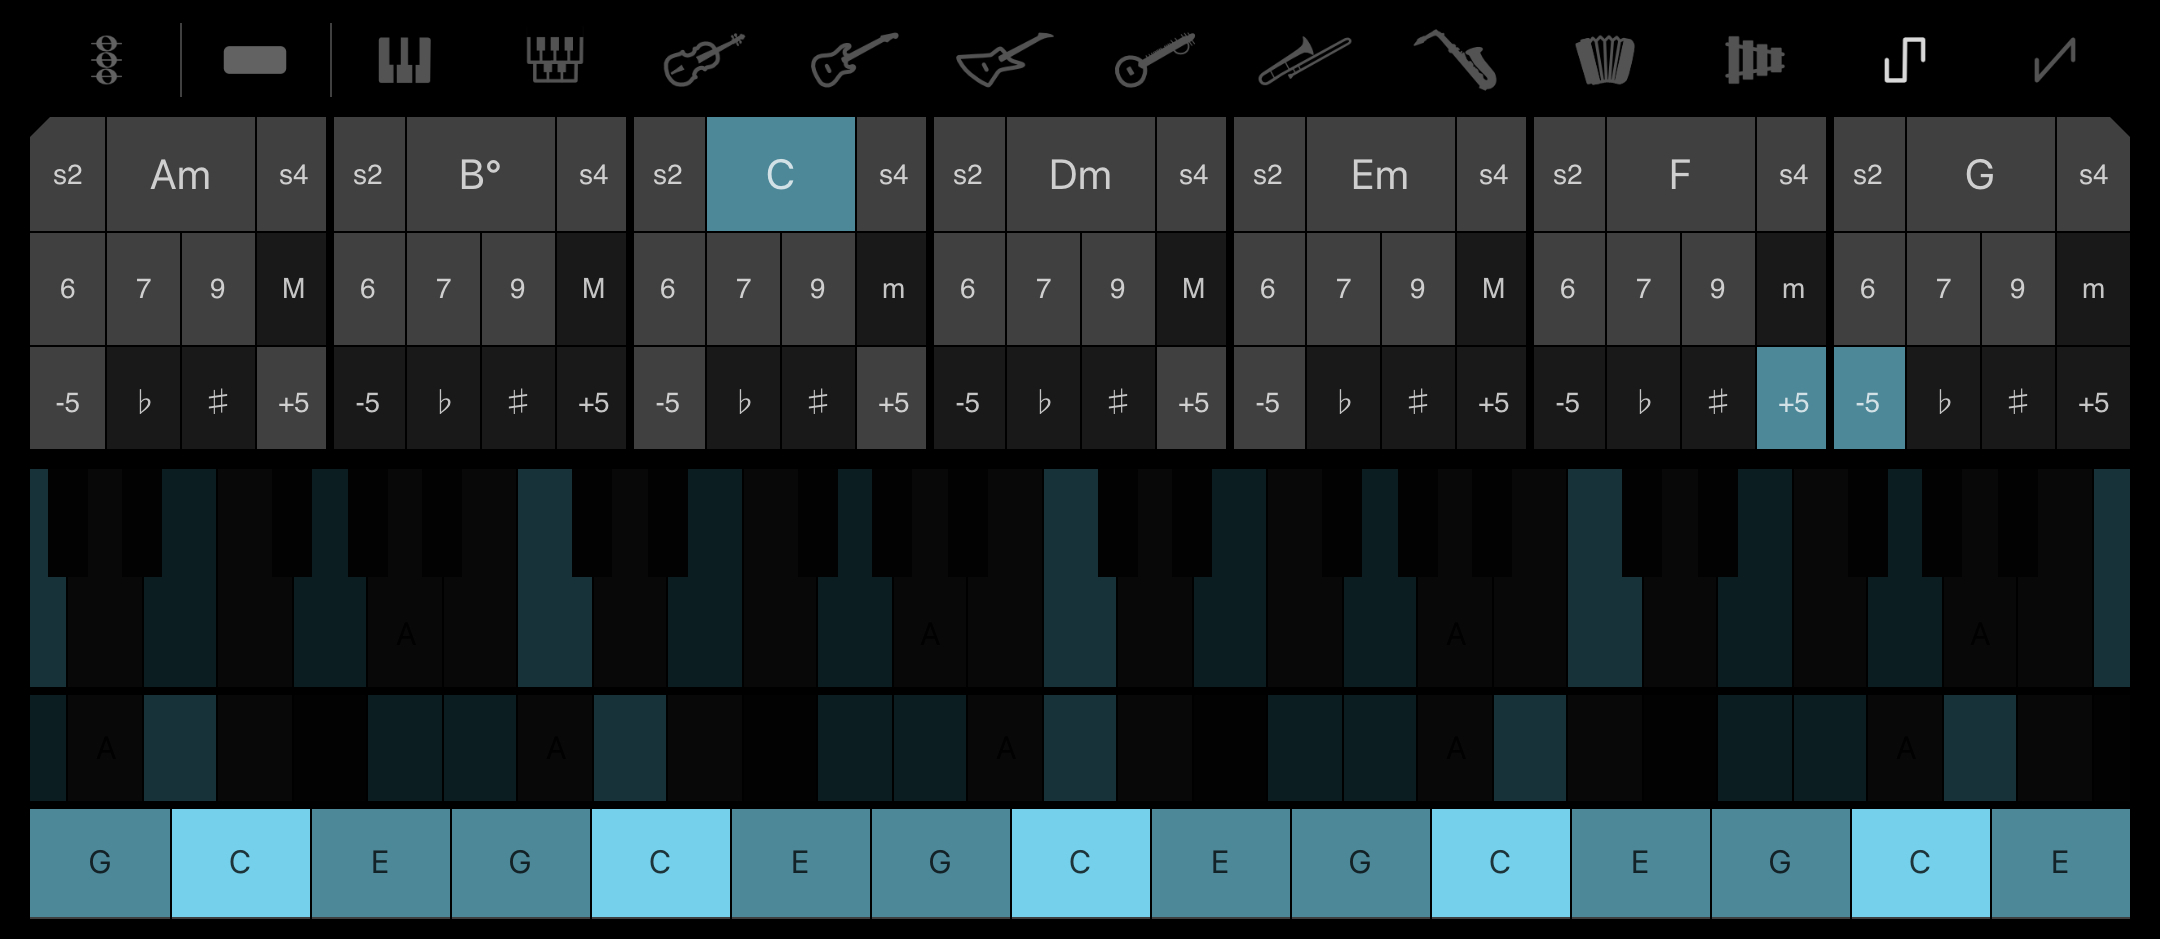
The Chords section allows you to quickly play a large set of notes directly related to the key you've chosen with a single press.
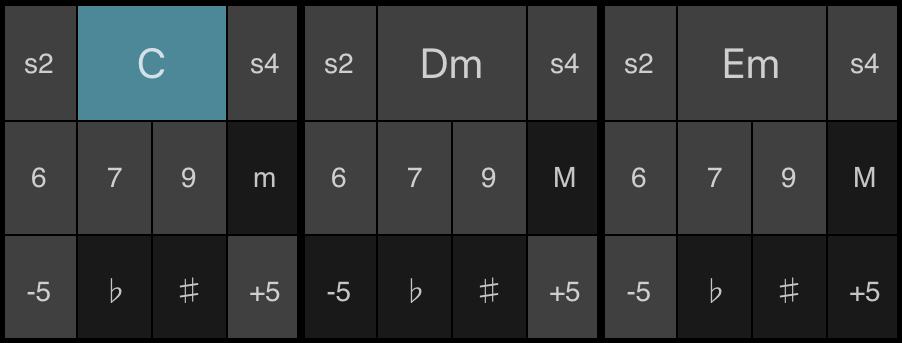
Chords in blue indicate that they are equivalent to the last pressed chord and signal that it as active. Chords in light grey are within the current key (selected in the Parameters bar at the top). Chords in dark grey are out of key, but are often related to the key for modulation (changing musical keys) or emphasis.
- s2: A suspended 2 chord (Sus2) is a triad with the middle note moved down an interval in the key relative to basic chord.
- Am: The basic triad (A minor in this example) is a 3-note chord formed by starting at the root note and using every other in-key note.
- s4: A suspended 4 chord (Sus4) is a triad with the middle note moved up an interval in the key relative to basic chord.
- 6: A sixth chord is a 4-note chord that includes the triad as well as an additional 6th interval.
- 7: A seventh chord is a 4-note chord that includes the triad as well as an additional 7th interval. There are many types of 7th chords, but Firo uses the 7th where all notes are within the selected key.
- 9: A ninth chord is a 5-note chord that includes the 7 chord as well as an additional 9th interval. There are many types of 9th chords, but Firo uses the 9th where all notes are within the selected key.
- M: The relative major / minor chord.
- -5: The basic triad shifted down a 5th (common key change / modulation via circle of 5ths).
- ♭: The basic triad shifted down a semitone (chromatic).
- ♯: The basic triad shifted up a semitone (chromatic).
- +5: The basic triad shifted up a 5th (common key change / modulation via circle of 5ths).
MORE ABOUT 7th CHORDS
There are many different types of 7th chords. If you're trying to play a specific one, you may be wondering, where are buttons for all of 7th chords?
The 7 chords directly playable in the chord section of Firo4 are all "in the key." That means that the particular chord that plays will depend on the tonic/scale you've set.
For example, in the key of C Major, the corresponding 7th chords in each section will take the form:
- Cmaj7 / CM7
- Dm7
- Em7
- Fmaj7 / FM7
- G7
- Am7
- Bm7b5
To play a 7th chord that uses a note "out of the key," you can either use the triad (primary 3-note chord) and add a note in the piano/scale section below, or play all of the notes directly.
And if you're ever uncertain of which specific chord you are playing, hold down the notes in the piano section and you can see its name (just above the chord section, near the left side).
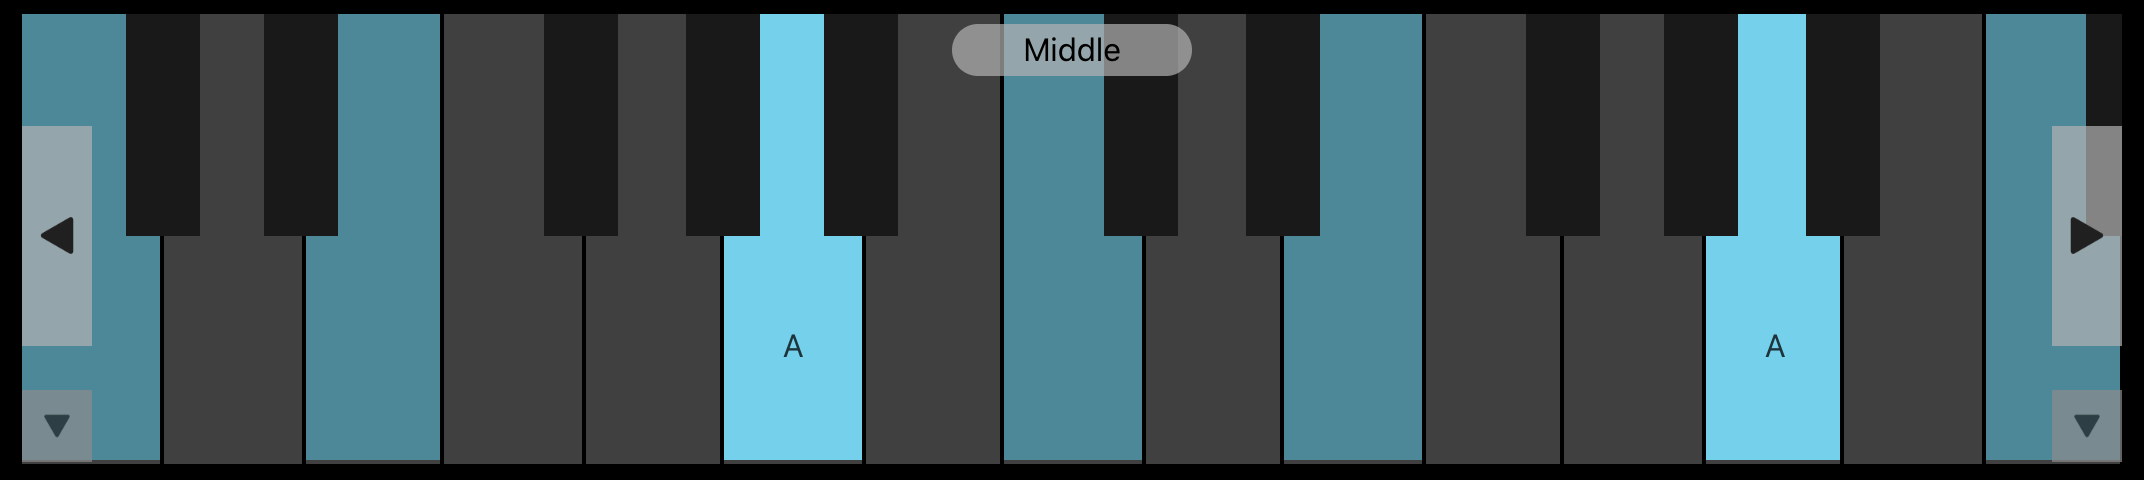
PLAYING NOTES
Below the Chords section is a contextual, polyphonic, tonal keyboard for playing notes. This advanced interface is designed to be familiar to most musicians, while also enabling new capabilities that guide and empower musicians to play with new forms.
The size of each key has been carefully designed to maximize expressiveness with the instrument. They may seem small at first, but like any instrument, with a little practice your fingers will begin to remember the relationship between distance and pitch in each row.
All keys respond to how precisely you press them. Pressing in the vertical center of each key produces the loudest volume, while pressing near the top or bottom edges sounds significantly quieter. This mapping leads to natural variations in sound that both add to the emotion of your music and provide helpful subtle feedback when your fingers drift closer to the edge of a row.
Note that you may want to disable "Multitasking Gestures" in the Settings → General section of your device. This ensures that the screen won't jump around when you start playing with lots of fingers at the same time.
MUSICAL KEYS AND SCALES
Words like "tonic" and "mode" are common in music theory, but if you haven't learned about them yet don't worry. They're just specific ways of describing how notes are related, and they are a powerful way to build tonal intuition once you understand what they represent.
Essentially, the tonic is the first note in the sequence of notes that define what key you're playing in. Changing the tonic shifts everything around, but all the relationships between the notes stay the same.
The mode determines the order of the 7 diatonic triads (3-note chords that you get if you skip every other note in the key). Often the tonic and the mode are considered together and simply called the key. So if you were playing in the key of "C Major" the tonic would be C and the mode would be Major. Note that the same notes may appear in multiple keys, but their order will be different ("A Minor" has the same notes as "C Major" but starts on the A instead of the C).
In addition to tonic/mode/key, Firo4 allows you include a related scale. The scale contains common notes that are often useful to set the overall mood or feel of a song. For example, lots of rock and pop music use the 5-note pentatonic scale. And scales don't have to be completely in-key, like the blues scale which contains an out-of-key note that's great for building tension and adding depth. Combined with chords, the scale is often helpful for creating melodies and harmonies that move around in more interesting ways than using only the in-key notes.
» Rows 1&2: Dynamic Piano
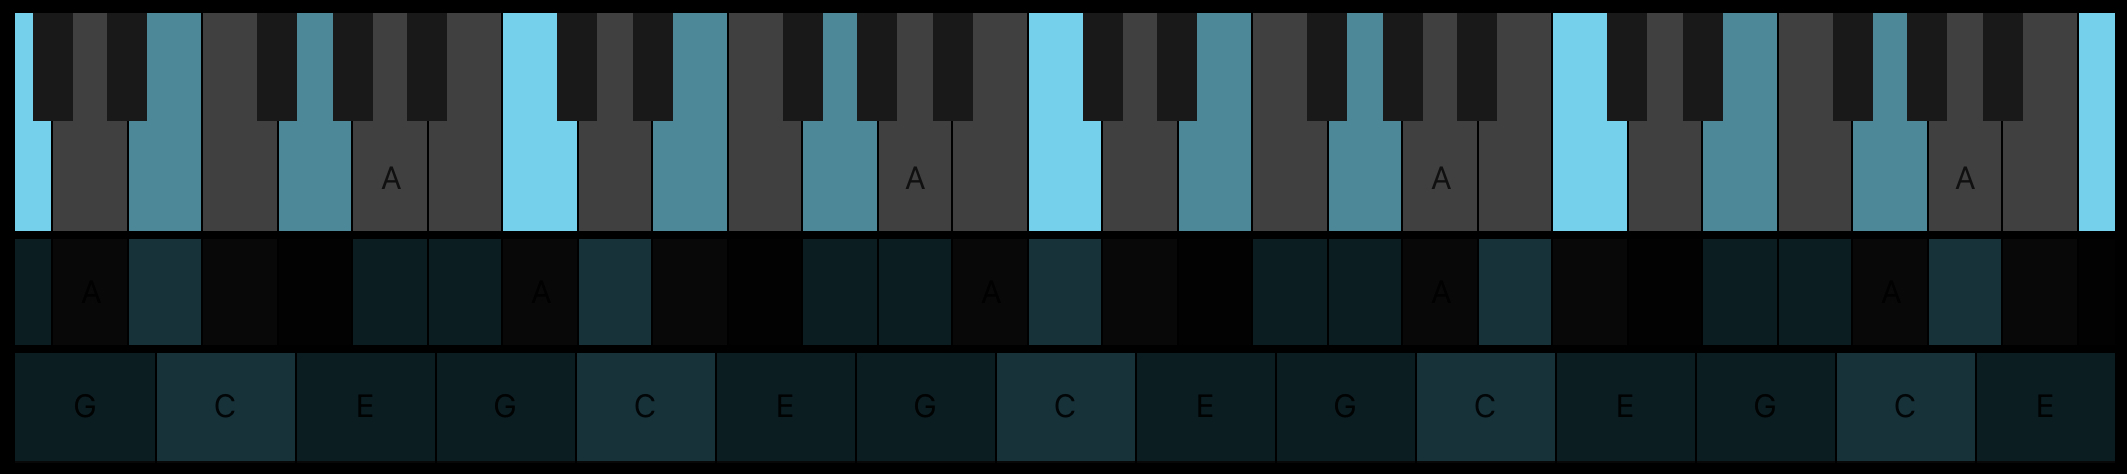
The top two rows (chromatic and diatonic) can be considered together as a piano. However, when the "Piano follows key" mode is enabled (see Advanced Settings in the help/info overlay) there is a fundamental difference; the notes on the Firo4 "piano" will turn yellow and dynamically shift to align with the key you've selected.
For example, in the "Piano follows key" mode, when playing in the key of A minor or C Major, the notes correspond exactly to those on a traditional piano. But for most other keys, the notes are shifted along the interface to preserve their spatial relationships, and thus located in a different position than on a piano. By preserving the spatial relationship between notes across any key, it becomes trivial to transpose a song to another key – just change the key and play the same thing.
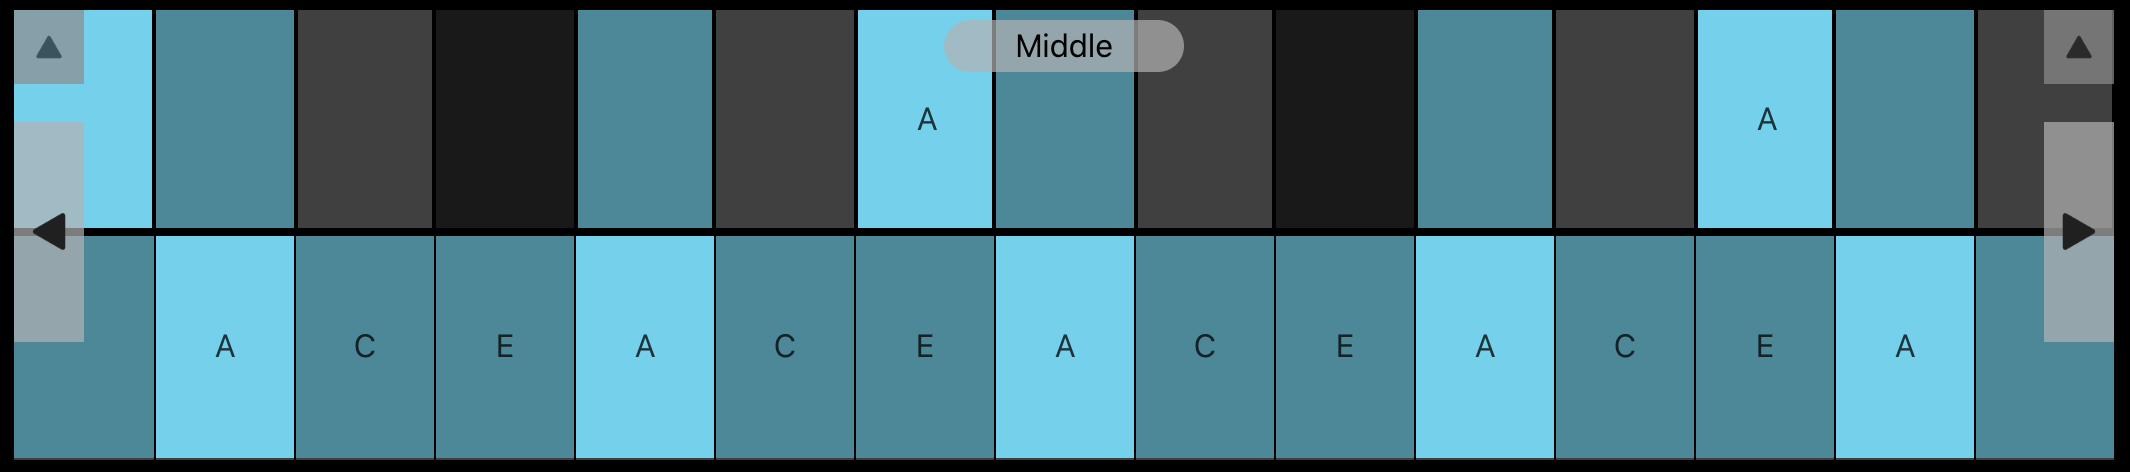
» Row 3: Scale
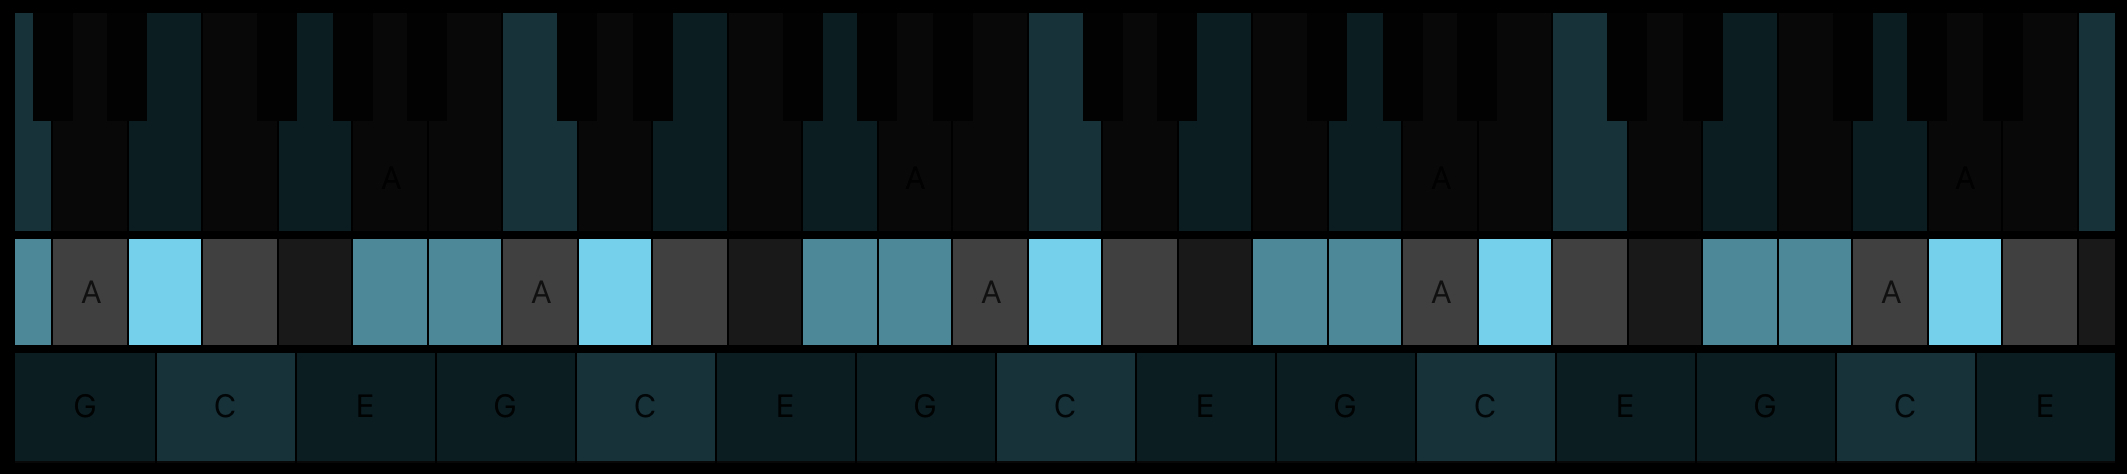
The third row of notes are mapped to the scale selected in the Parameters section at the top of the instrument. Here, the blues scale is selected and since we are in the key of A minor, we get the full A minor blues scale.
In the blues scale, the blue note is actually out of key, and can be easily spotted due to its darker color.
The natural intervals of each scale can be observed when in the major mode of the key. Each scale is able to function for all keys and modes, but the tonic or root notes may not always be present.
» Row 4: Zither / Autoharp
The last row is built entirely from the notes in the active chord (whatever was last played in the Chords section). These notes are repeated by octave and extend higher and lower toward the edges.
By combining quick chord selection and note-within-chord playability, the last row serves as a chorded zither, or autoharp. This form of input can be freeing since all notes in the row are always within the chord, allowing you to focus on timing and range instead of worrying about hitting a wrong note.
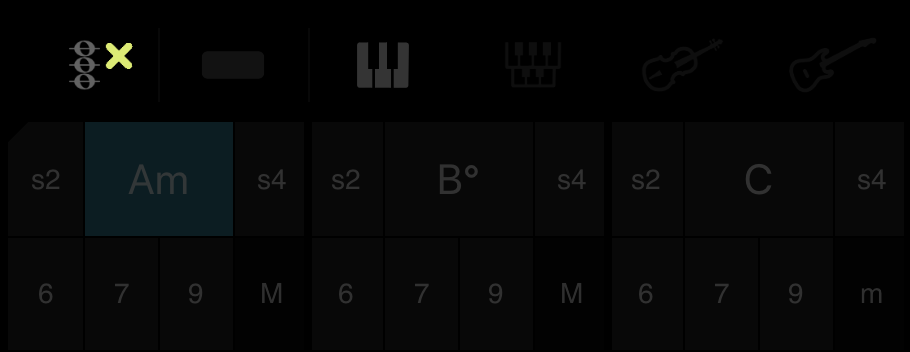
You may want to mute the sound of the chords themselves so you only hear the output from the zither. To do so, press the button on the far left just above the chords section.
The small size of the notes on the keyboard was chosen to maximize the range of dexterity, tonal span, and space available on the instrument. This gives you access to a very large set of notes without needing to flip through octave pages or reset your hand position.
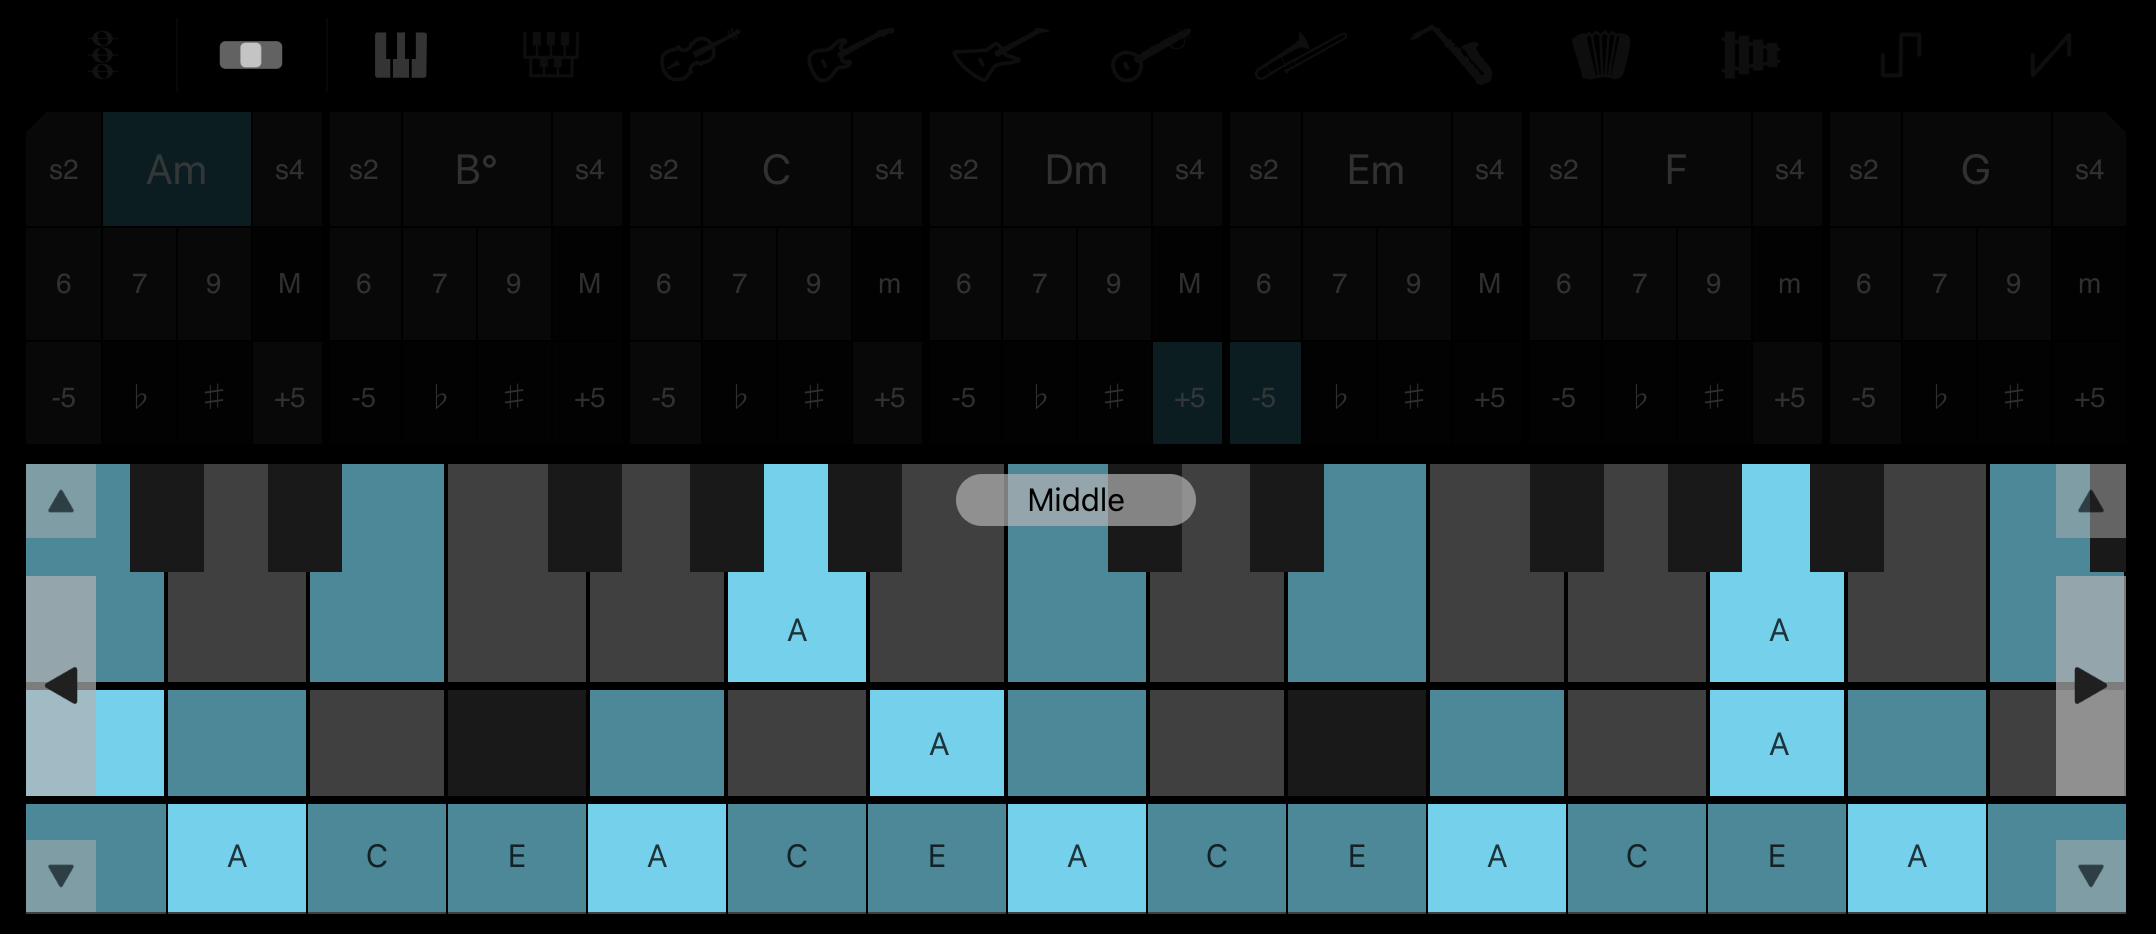
However, sometimes a larger sized keyboard with greater tonal range is desirable for tedious solos or extreme low/high sounds. To enlarge the keyboard, press the second button from the left above the Chords section.
Once enlarged, you can move the range of the notes on the keyboard up or down by pressing the arrows at the sides.
You can also vertically enlarge the keyboard to only show the top two or bottom two rows.
This can be helpful when you want greater control over note velocity, or just prefer the feel of the piano or scale/zither layouts.
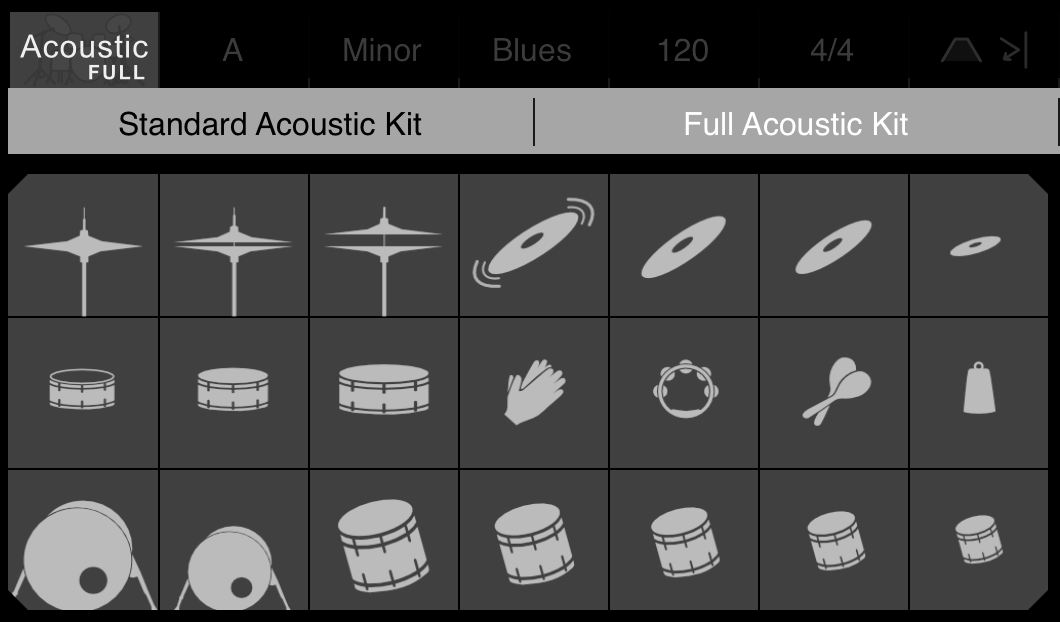
PLAYING DRUMS
Firo4 contains four drum kit interfaces; 2 acoustic and 2 electronic. Within each kit type (acoustic/electronic) there is a standard and a full view that allow for either more playing precision or more samples respectively.
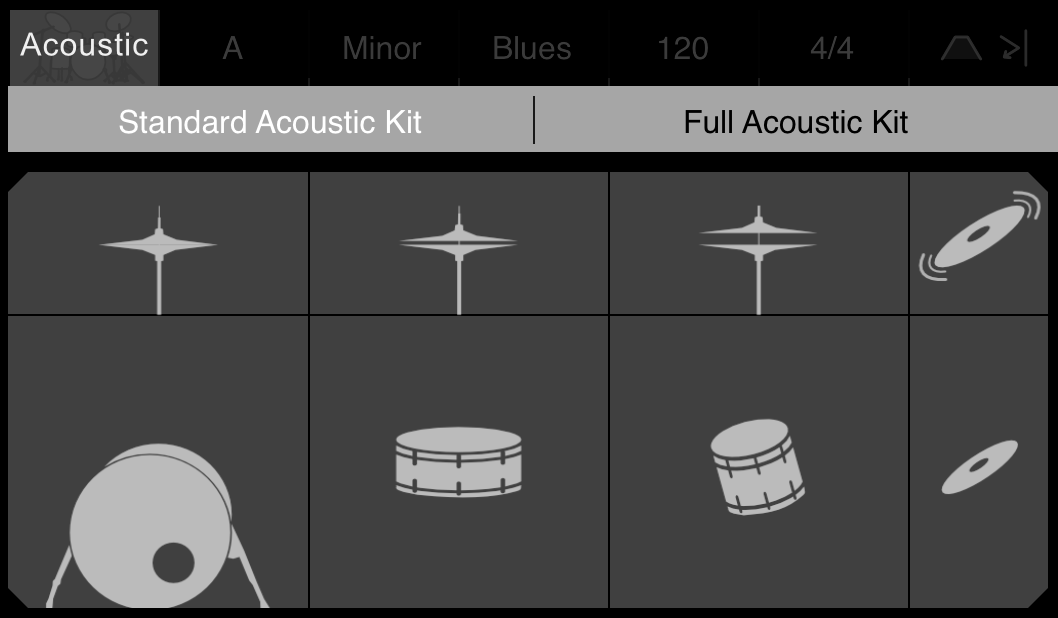
To change the drum kit, press on the top left corner and select the new kit you wish to play. Note that you can swap between kits even while you're playing other parts of the instrument.
MULTI-CHANNEL LOOPER
Firo4 includes five auto-expanding, synchronized loopers offering layering, contextual sizing, replay, and simple undo/redo via press-and-hold.
Before you get started with the looper it's important to know that the first loop you record when all channels are clear is special because it informs the sizing and synchronization behavior of subsequent loops.
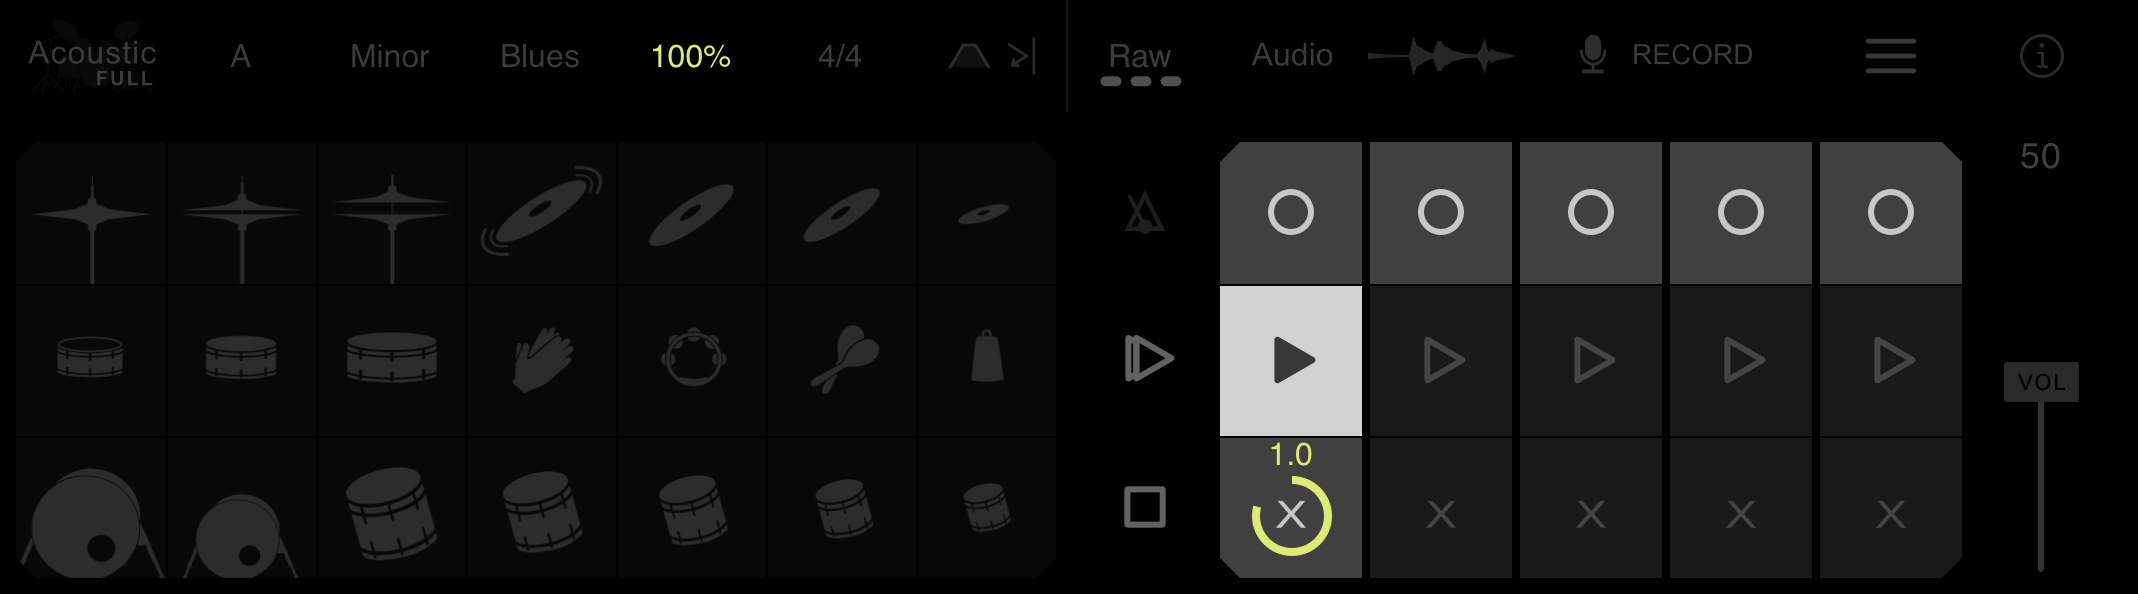
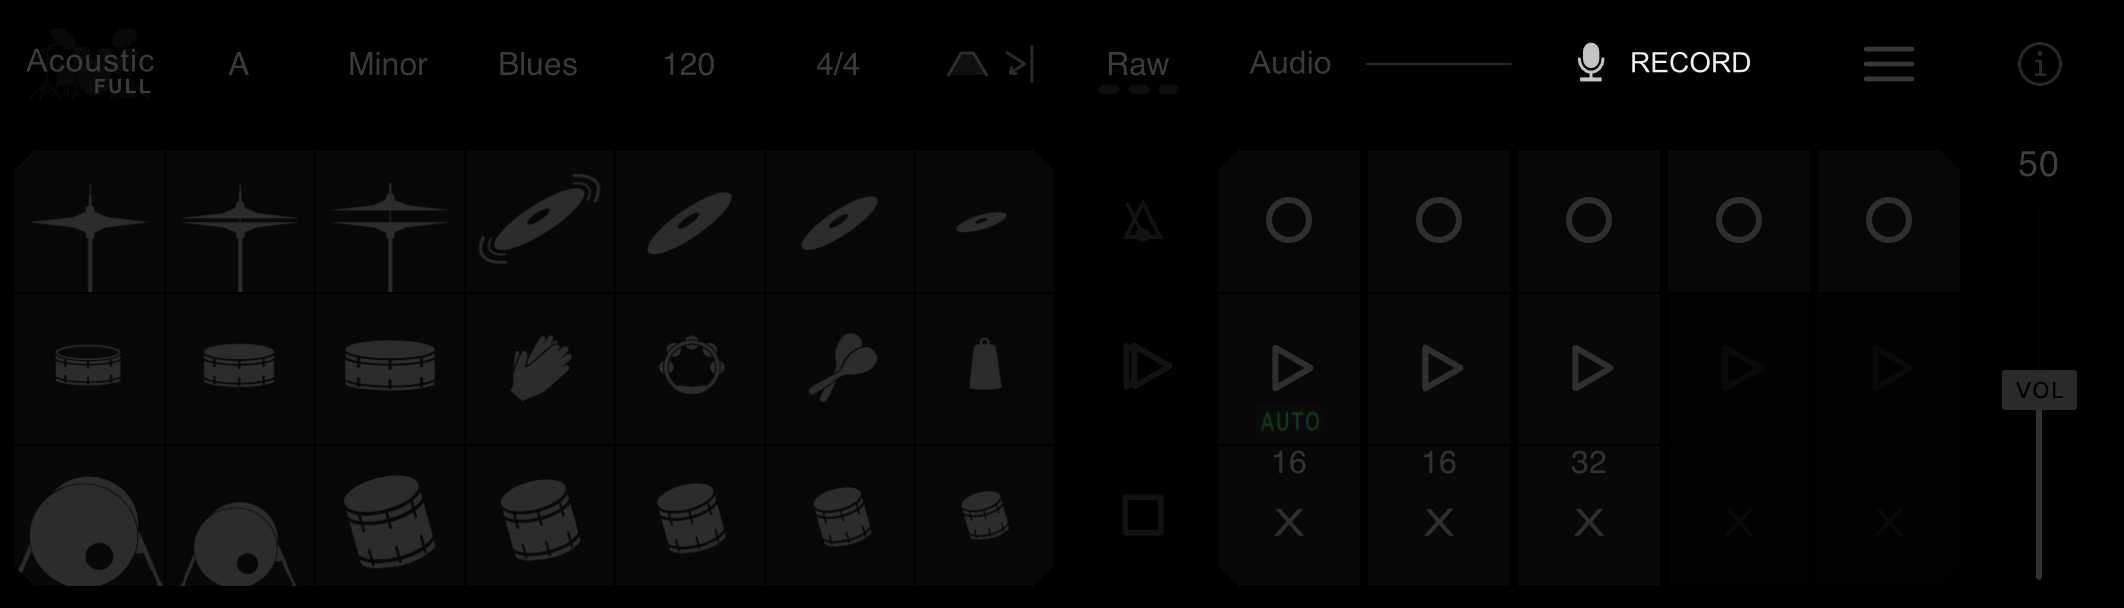
Here's what the looper looks like when no loops have been recorded yet.
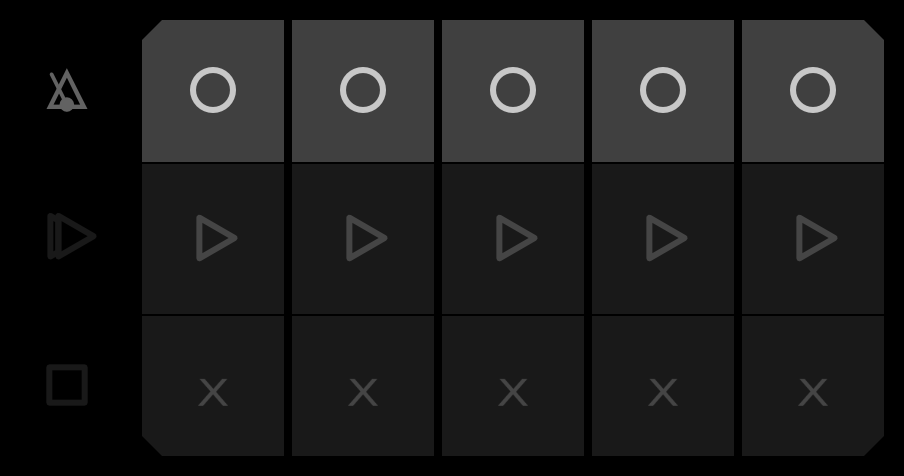
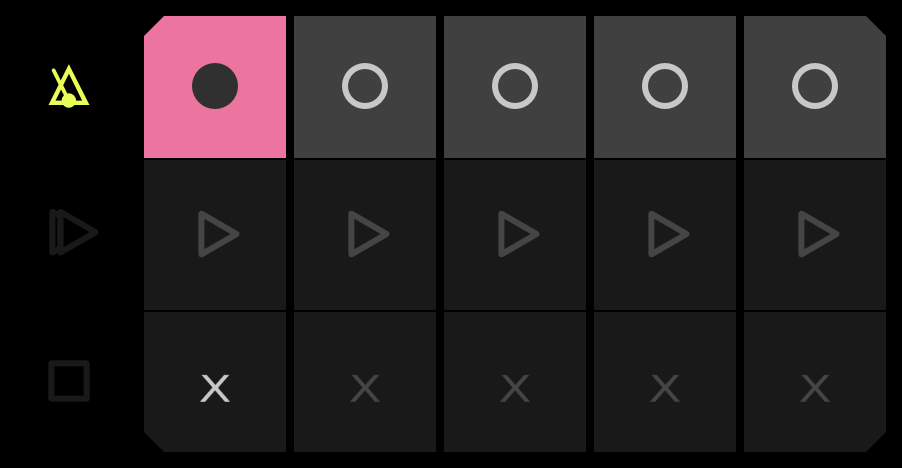
To recored a new loop, press on one of the circle shaped record buttons to arm it. The loop is now ready to record your input, and waits for your first sound (so relax, and start when you're ready).
Notice that the click track will also come on to help you align your loop to the tempo you have specified in the Parameters at the top.
Once you've played something, and you're ready to stop recording (and start looping), press the loop record button again.
If instead, you want to cancel the recording altogether, press the ‘x' below it.

A playing loop can be easily stopped by pressing on the bottom 'x' or restarted by pressing on the middle play button.
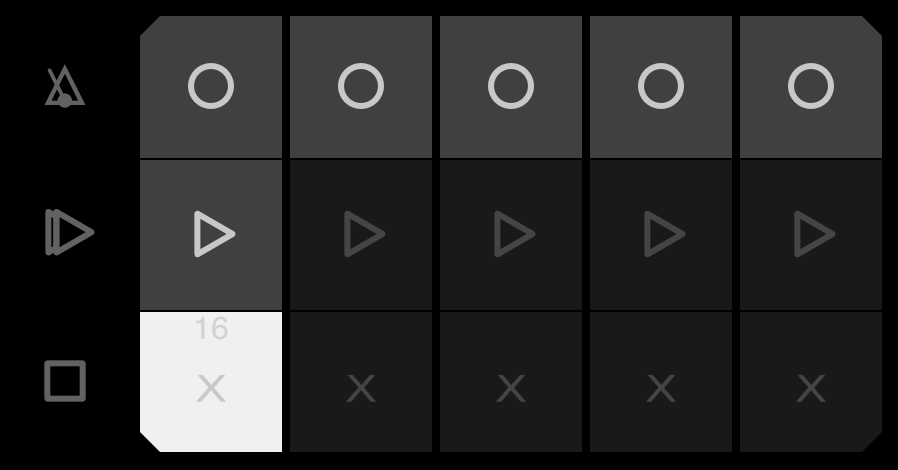
Notice that the loop playback indicator appears as a yellow circle under each channel's play button and also includes the loop's length in beats.
Pressing and holding on the loop record button will Undo/Redo the last recorded notes. This can be useful if you accidentally record a loop, only to find it slightly off when you listen during playback and want to undo it.
To clear a loop channel, press and hold on the bottom 'x'.
UNDERSTANDING LOOP TIMING
After you record your first loop, subsequent loop channels will auto-expand to stay in sync with what's playing.
For example, If you recorded 12 beats in the first loop and it is playing, when you record on the next channel it will automatically size to be an integer multiple of 12 (i.e. 12, 24, 36, 48, …).
The reason subsequent loops are not shorter by default is that you may want to add a part that occurs for a small section of the overall loop and don't want it to auto-repeat every measure (such as adding a small drum fill in the last measure of a longer loop).
You can get around the auto-sizing if want to force the size of a subsequent loop. Just make sure no other loops are playing (and thus the shortest playing loop size is zero) when you record your new part. This can be useful if you initially record something long (like a 48-beat bass line) and want to add a shorter looping part (such as an 8-beat drum pattern).
ANALOG LOOPING
Once you master the basics of looping with Firo4, you may want to explore analog looping, or looping without the use of a click track. This is great for pushing beyond the rigidness of a beat sync'd system, but also requires greater skill to keep notes and rhythms aligned.
Analog looping is enabled whenever the first loop is recorded with the click track turned off.
If you want to enable analog looping by default, open the Info Overlay, and in the Advanced Settings panel, set "First loops starts" to Analog.

Assuming that the click track is turned off (either manually or via Advanced Settings), you can now record an analog loop using the same process as normal.
Pay close attention to when you stop your loop, as this is very important for timing when in the analog mode.
When you finish recording, you'll notice that all beat-based parameters become normalized for analog looping and appear in yellow.
Also note that the click track and the beat quantization parameter are disabled while in analog mode.
To revert back to non-analog, beat sync'd looping, simply clear all loops and make sure the click track is playing next time you record a loop.
CHORD AUTOMATION
When building a song with a chord progression, it's often helpful to have Firo4 "automate" those chords back after recording.

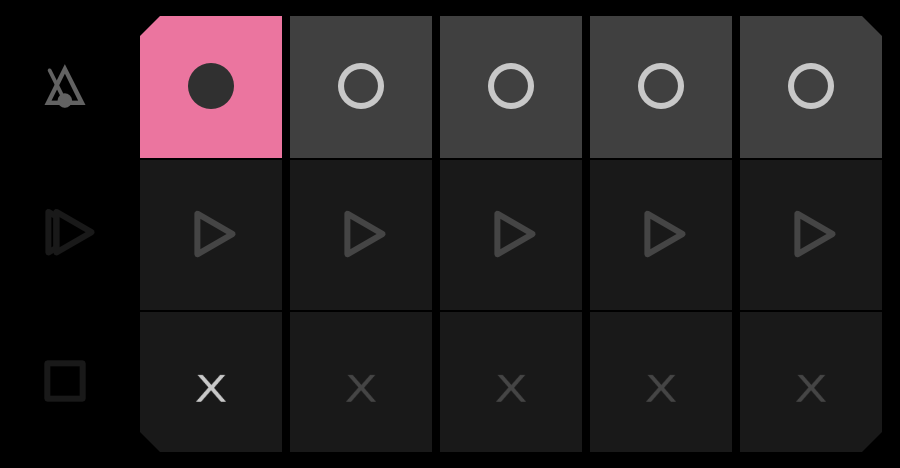
By pressing and holding on the chord mute button, chord automation recording is enabled. The chords will appear green to indicate that any newly recorded loops will also include chord automation behavior.
In particular, chord automation is great for recording a chord progression and then playing melodies and harmonies over it using the zither/autoharp row on the keyboard. Since the automated chords update as the loop plays back, the corresponding notes in the zither will also change and stay in sync.
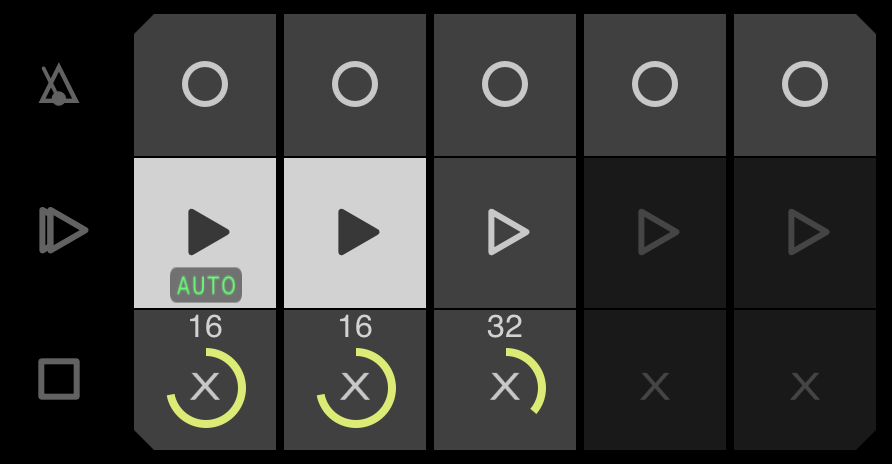
Also note that any loop channel with chord automation will show up with a small green indicator on the play button (as shown in the left-most channel above). This is intended to make playback intuitive and glanceable so that the instrument doesn't unexpectedly jump around as you're playing.
To disable chord automation recording, tap on the chord mute button again.
Note: For advanced users who wish to enable chord automation recording with the chords muted, this can be achieved by pressing and holding on the chord mode button for a full 2 seconds.

IMPORTING SOUNDFONTS
Firo4 allows you to replace all instrument and drumkit sounds with imported SoundFonts (SF2 files). Each SoundFont file contains many presets and should use the standard General MIDI mapping to correctly correspond with the standard Firo instruments.
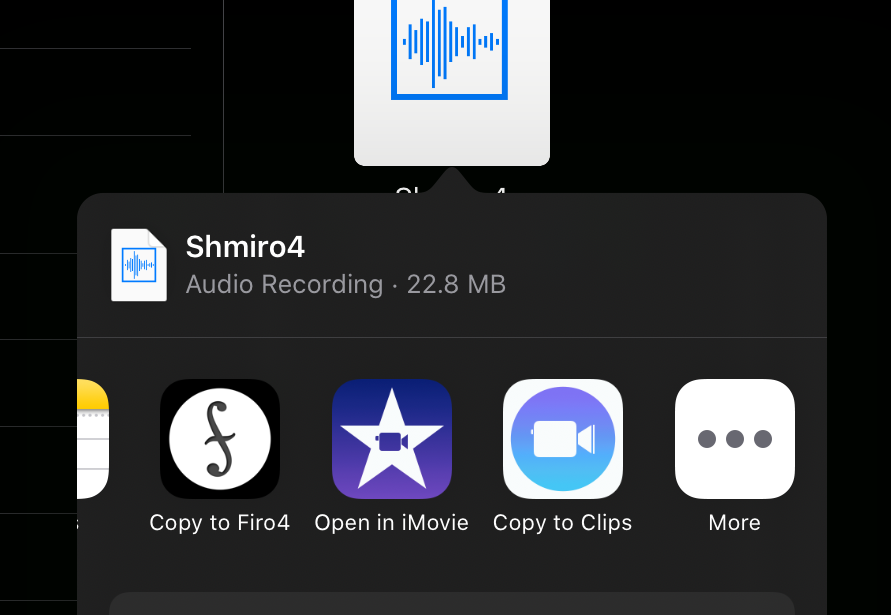
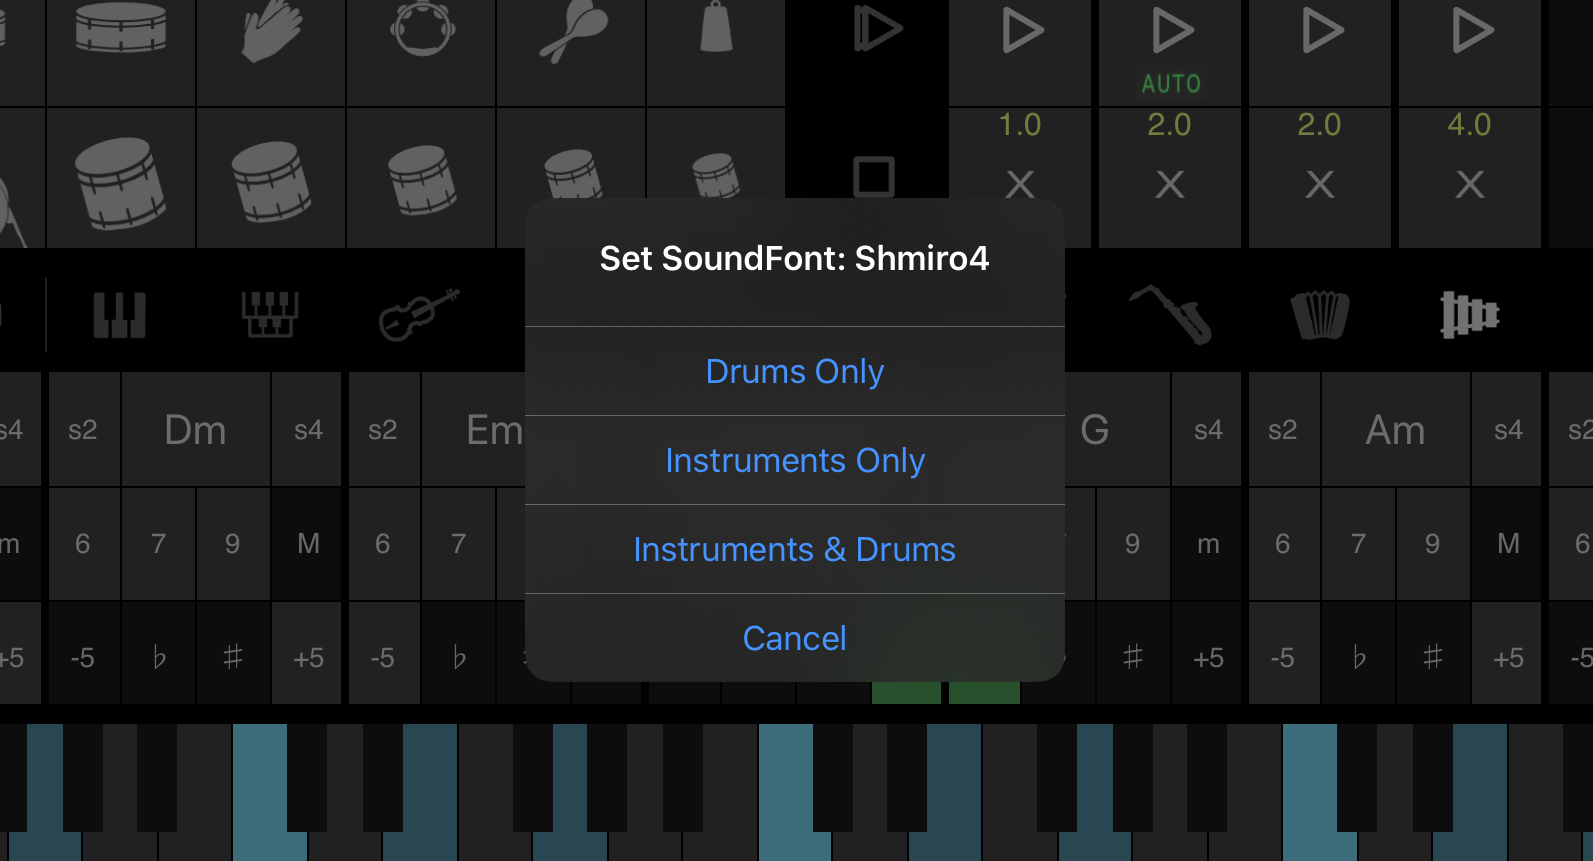
To import a SoundFont file, open it with any basic file app on iOS (or even as an email attachment), select the file, and choose "Open in Firo4." When the file is opened by Firo4, you will be prompted to select where you would like to place it.
When a custom SoundFont is in use, a small indication label will appear over the scope section in the top bar. In this case, with both Instruments and Drums using the new SoundFont, both purple and white labels appear.
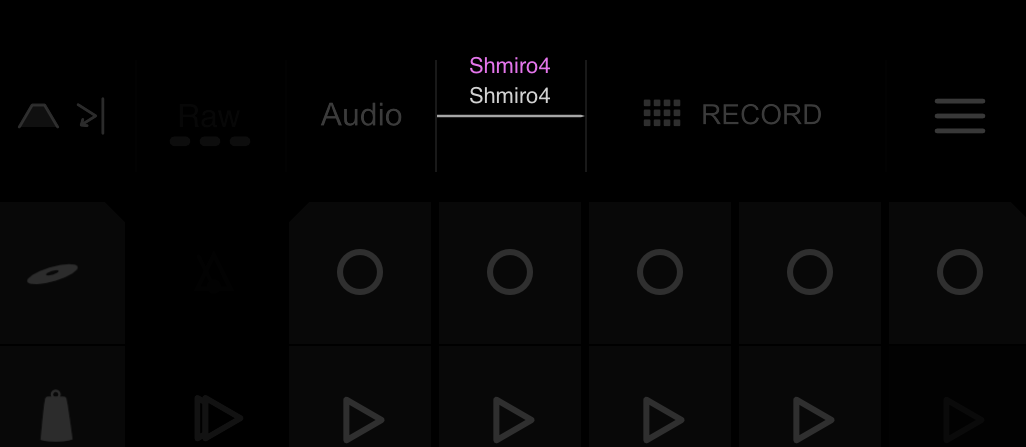
You can also access the full list of SoundFonts you've imported via the SoundFont selection view within the Files section in the top bar.
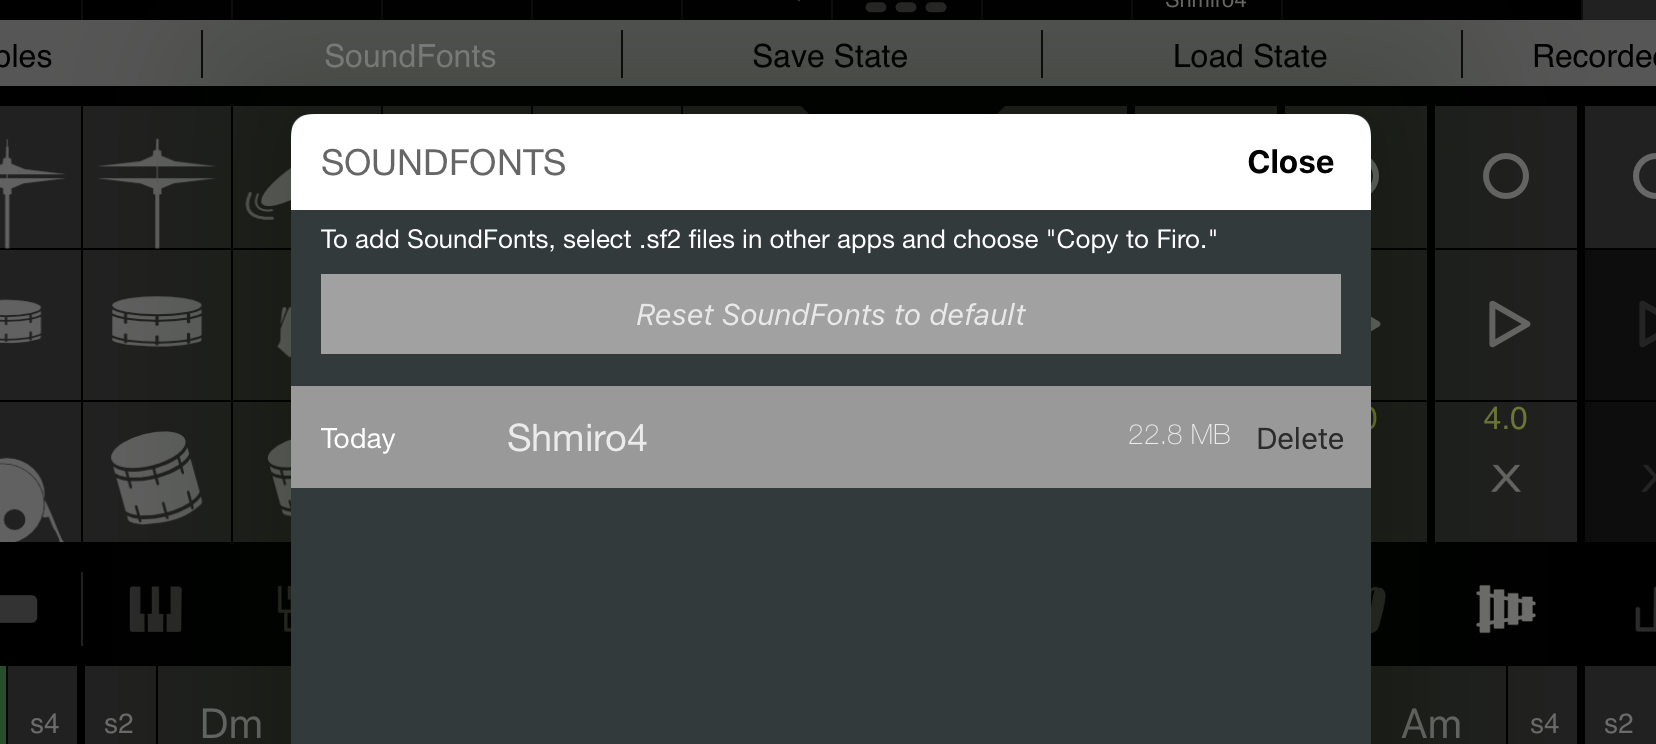
Notice that there is also a button at the top of the SoundFont selection view to reset back to the default Firo4 sounds at any time.
MIDI instruments are mapped to the following presets:
- Piano: 1
- Organ: 18
- Strings: 41
- Guitar: 26
- Distortion Guitar: 30
- Sitar: 104
- Trombone: 57
- Saxophone: 64
- Accordion: 21
- Marimba: 12
- Square Wave: 80
- Sawtooth Wave: 81
The MIDI samples used for drum kits are as follows:
Full Acoustic Kit (MIDI Drum Preset 000)
- Row 1: 42 (closed hi-hat), 44 (pedal hi-hat), 46 (open hi-hat), 49 (crash), 59 (ride 1), 51 (ride 2), 55 (splash)
- Row 2: 37 (side stick), 38 (acoustic snare), 40 (electric snare), 39 (hand clap), 54 (tambourine), 70 (maracas), 56 (cowbell)
- Row 3: 35 (acoustic bass), 36 (bass drum), 41 (lowest floor tom), 43 (low floor tom), 45 (low tom), 47 (low-mid tom), 48 (mid tom)
Full Electronic Kit (MIDI Drum Preset 025)
- Row 1: 42 (closed hi-hat), 44 (pedal hi-hat), 46 (open hi-hat), 49 (crash), 51 (ride 1), 59 (ride 2), 55 (splash)
- Row 2: 29/30 (randomly selected scratch), 38 (snare 1), 40 (snare 2), 39 (hand clap), 54 (tambourine), 70 (maracas), 56 (cowbell)
- Row 3: 35 (bass), 36 (bass drum), 41 (lowest floor tom), 43 (low floor tom), 45 (low tom), 47 (low-mid tom), 48 (mid tom)
Resetting SoundFonts back to default:
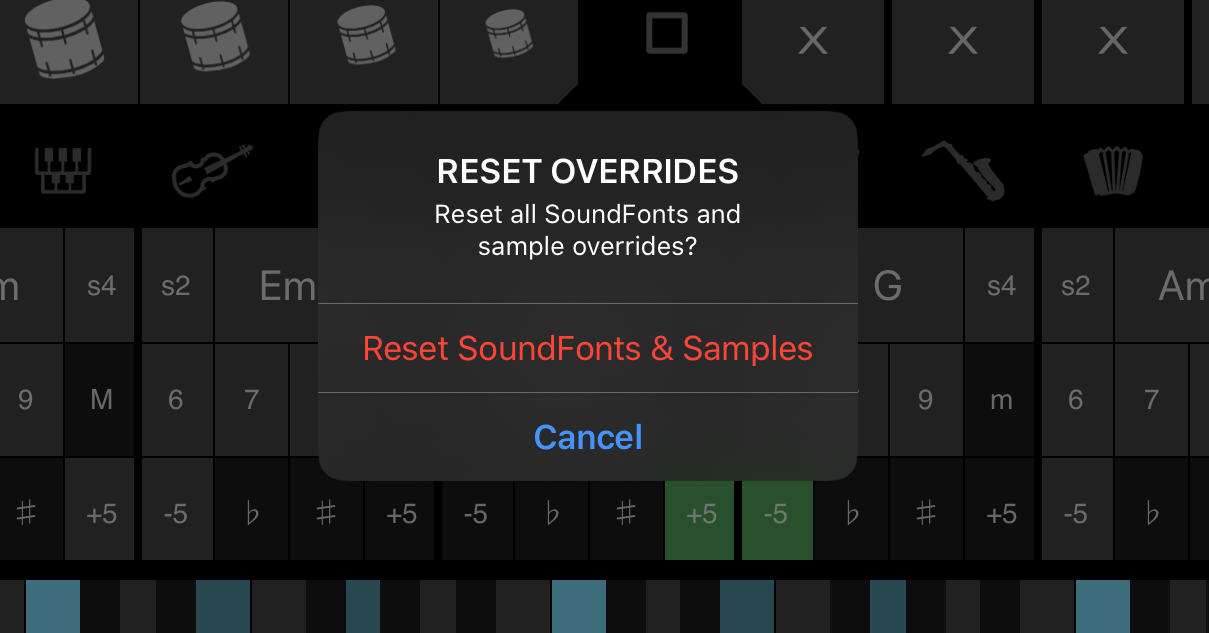
When a custom SoundFont is in use, you can also immediately reset back to the default sounds by tapping on the Scope section in the top bar. A confirmation will then appear to make sure you want to reset back to the default sounds.
AUDIO SAMPLE OVERRIDE
In addition to using custom SoundFonts to change the entire set of instruments and drum kits, you can individually override each instrument with custom audio samples. The new audio sample is then mapped to the keyboard to give you full tonal control and allow it to be played as you would with any other instrument.
To add or modify a sample override, simply press and hold on any instrument selector. For example, pressing and holding on the Piano icon will bring up the Audio Sample selection view.
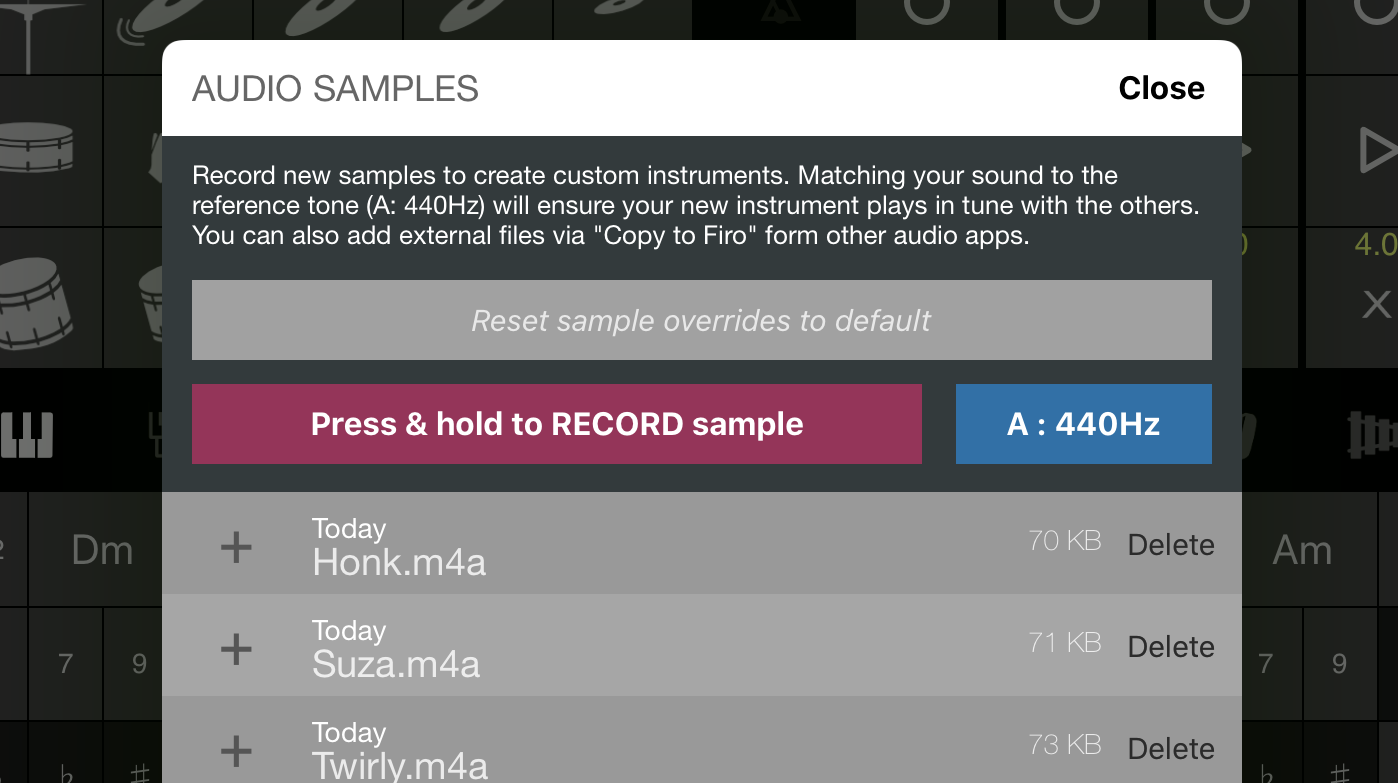
From here, you can record new samples (press and hold on the record button while making a sound, ideally at 440Hz to stay in tune), preview, and select (via the + buttons on the left).
After selecting a sample override, a configuration panel will appear next to the instrument you originally selected.
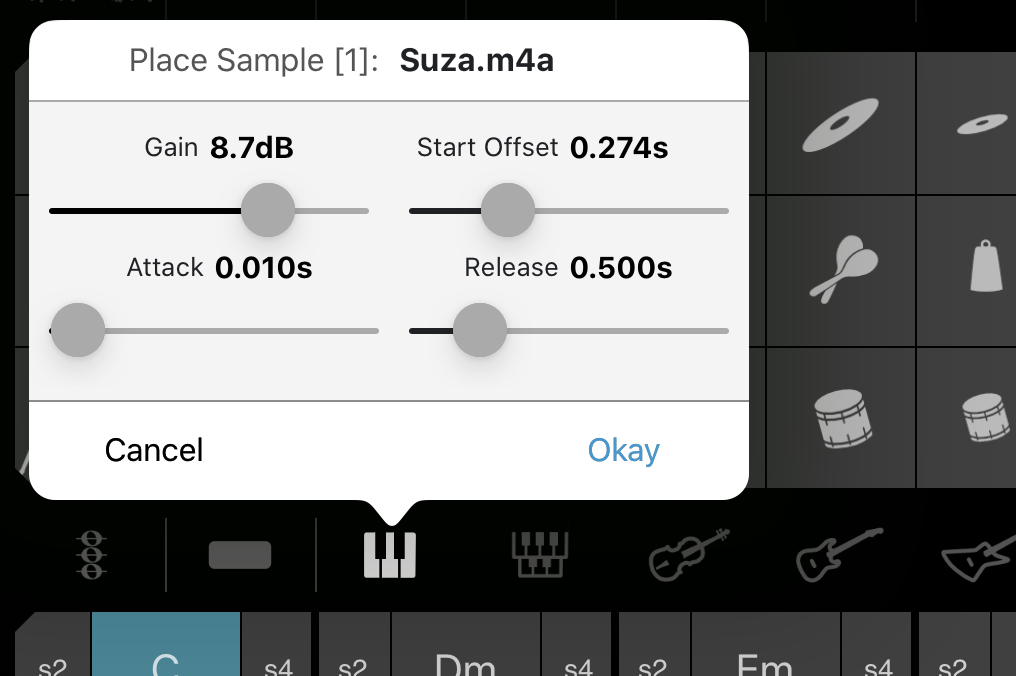
The sample configuration view allows you to set the channel, gain, start offset, attack, and release.
- Channel: The MIDI channel to override. This can be changed later if you wish to move your sample to another channel.
- Gain: Amplification of the sample if it's too loud or too quiet compared to the other instruments.
- Start Offset: Time into the sample to begin playback. This is helpful to remove the delay if you start recording just a bit too soon.
- Attack: The time for your sample to reach max volume after pressing a key. Short times will give your original audio, while long times produce a slow build (great for chorus or strings sounds).
- Release: The time for your sample to fade away after you release a key. Short times will stop abruptly, while long times will slowly fade away.
When you're done, press Okay and give your sample override a try.
To edit or clear the sample override, press and hold on the instrument selector icon again and the configuration view will re-appear.
RECORDING YOUR SESSION
Firo4 allows you to record up to 90 minutes of session audio and note data at a time. Simply press Record and play without worrying about losing your next great riff or song idea.
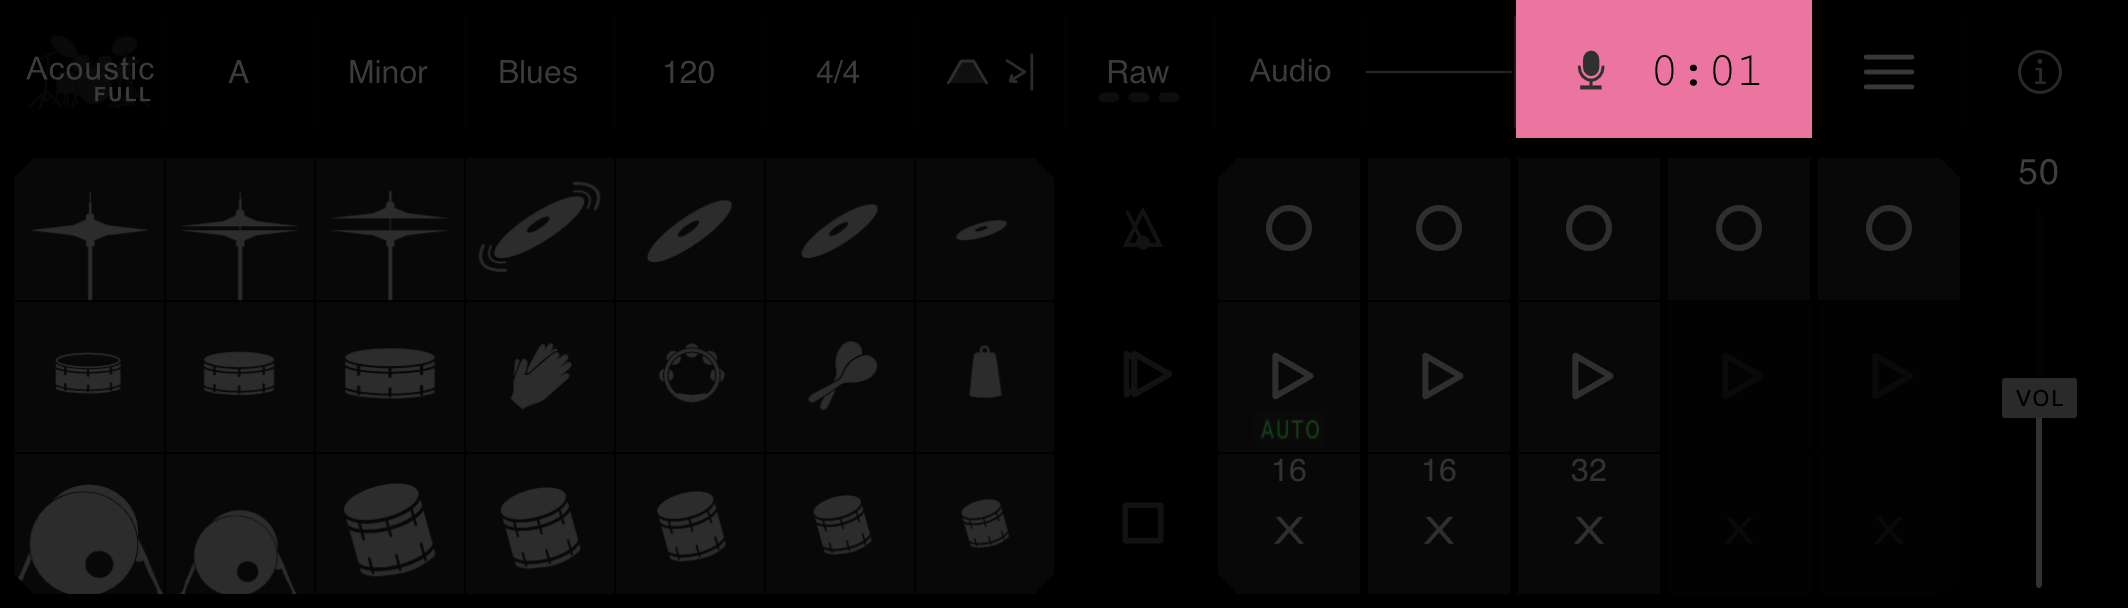
The Record button is located near the top right of the instrument.
When recording, the button will appear bright red.
When recording, all audio output and note information will be saved for use later.
The saved session audio file contains a left and right (stereo) audio channel, with the left channel containing the clean audio output and the right channel containing the audio input if you've allowed microphone access. That means you can sing along with your recordings, and then split your audio later if desired.
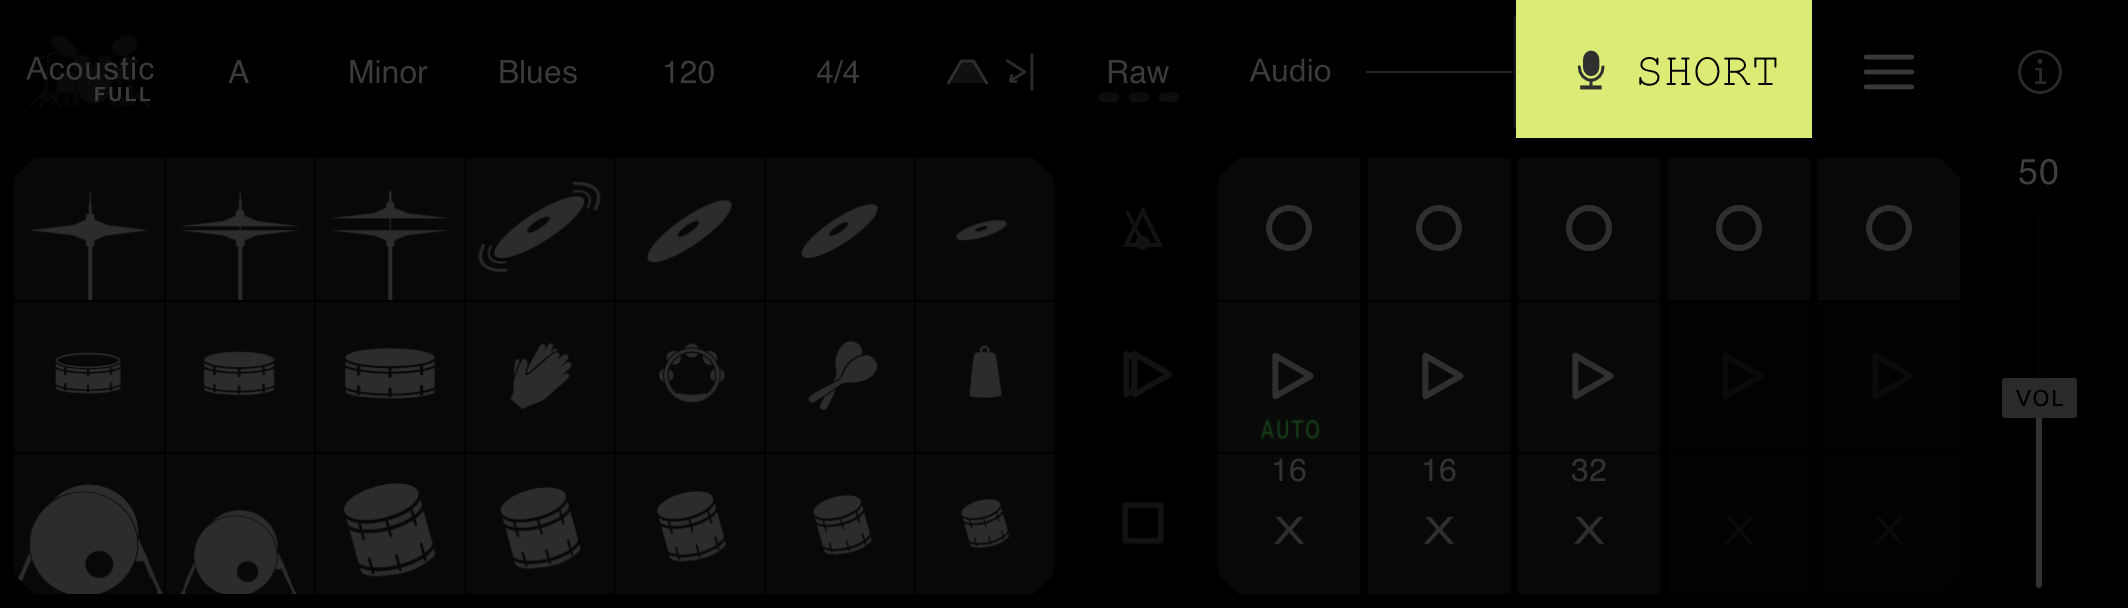
When you're done, just press the Record button again to stop recording your session and automatically bring up the Recently Recorded files.
Note: To minimize accidental session recordings, very short sessions (less than 3 seconds) are ignored.
PREVIEW / SHARE SESSIONS
Firo4 makes it easy to share your recordings with installed iOS apps.
To share a file, first open the list of recorded session files by pressing on the list button near the top right of the instrument.
All files are sorted by time, starting with most recently recorded at the top. You can close the file view at any time by pressing the Close button at the top right.
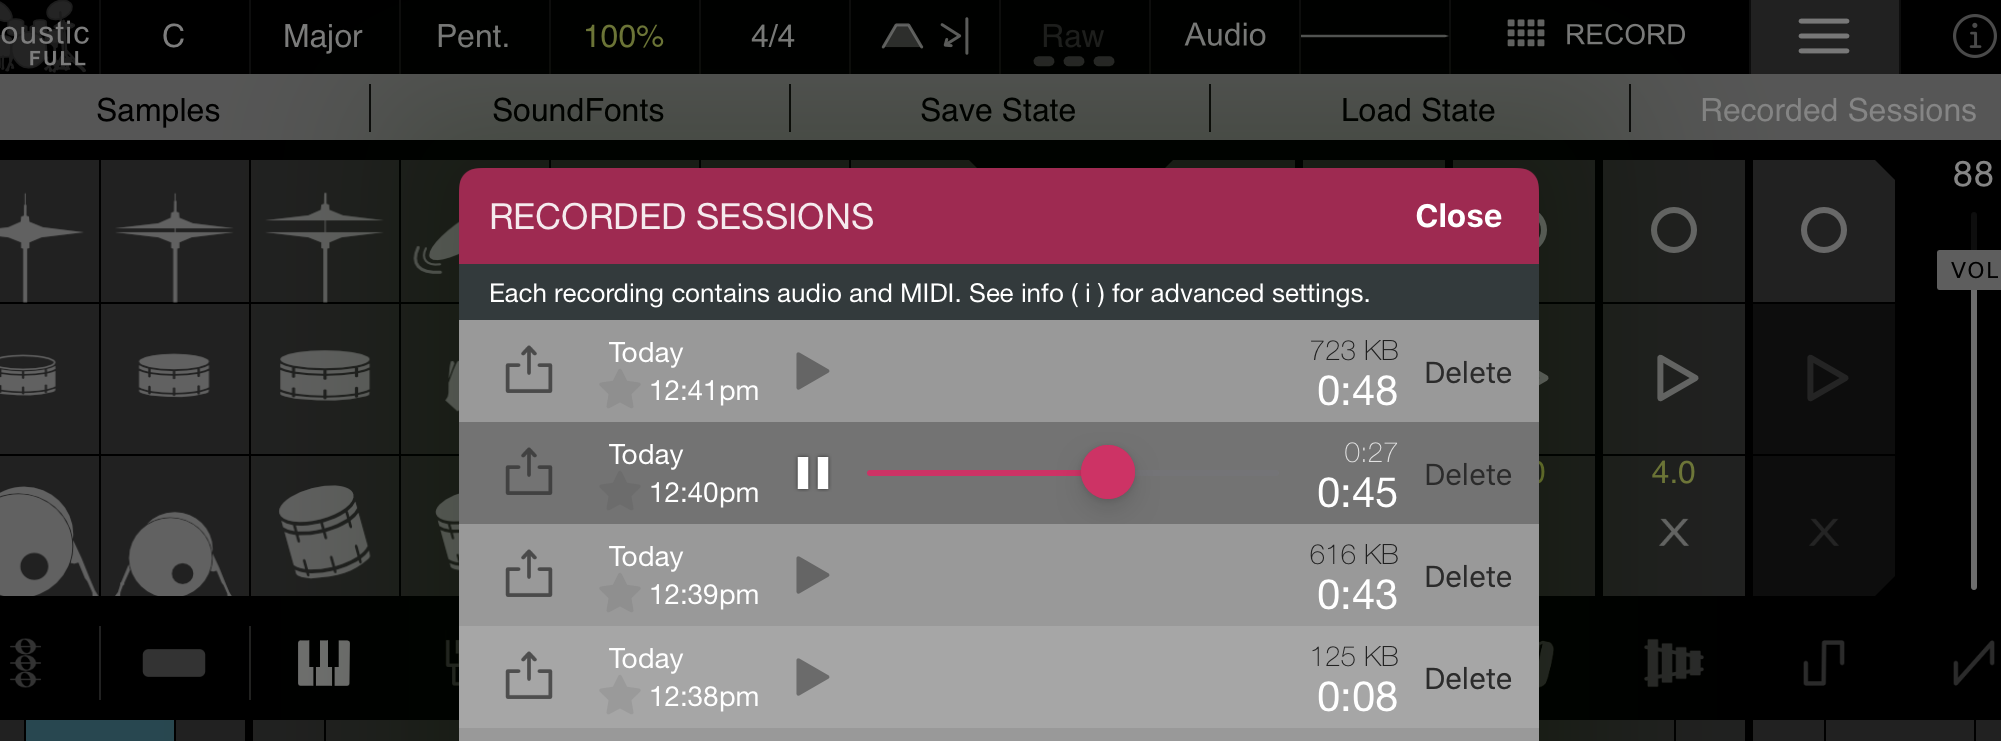
Preview any recording by pressing on the play button corresponding to the desired session. Once started, a playhead will appear and can be dragged to skip forward / backward through the audio.
Pressing the share button on the left of each session gives you options to upload and transfer your audio to other people and places
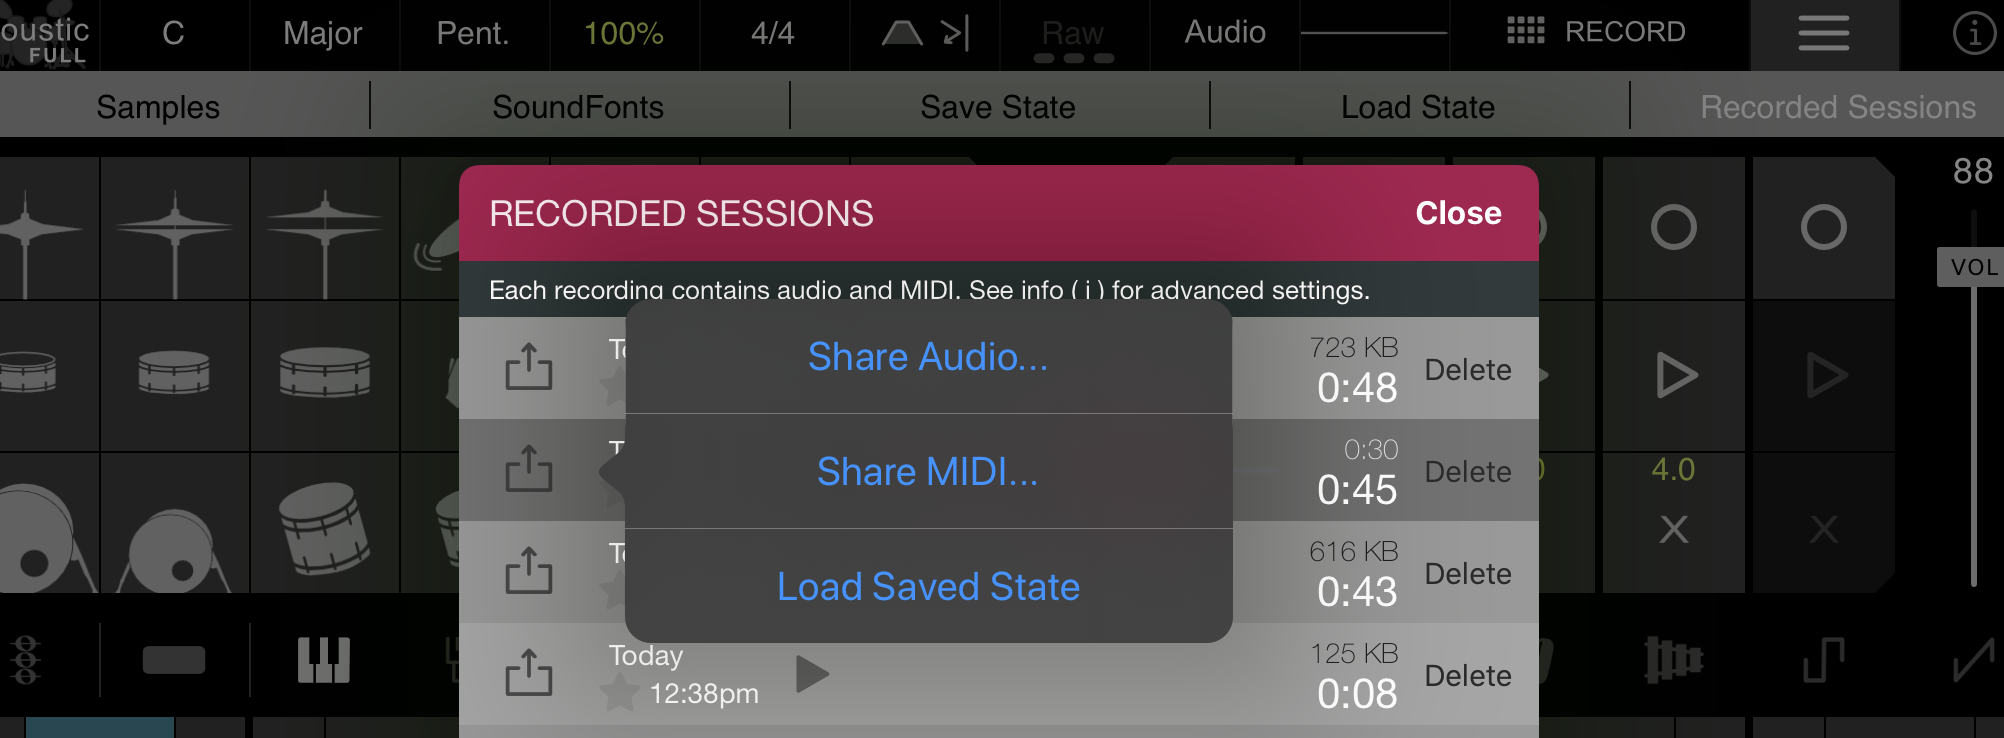
Session audio sharing options include:
- Share Audio: Share, send, copy, or upload audio file via other installed apps.
- Share MIDI: Share, send, copy, or upload MIDI file via other installed apps.
- Load Saved State: Load the last state saved when the session finished recording.
SAVING / LOADING STATE
In addition to saving the audio and MIDI output of a session, Firo4 also enables you to save and load the instrument's state. This includes all layout, configuration, and stored note information for all loop channels.
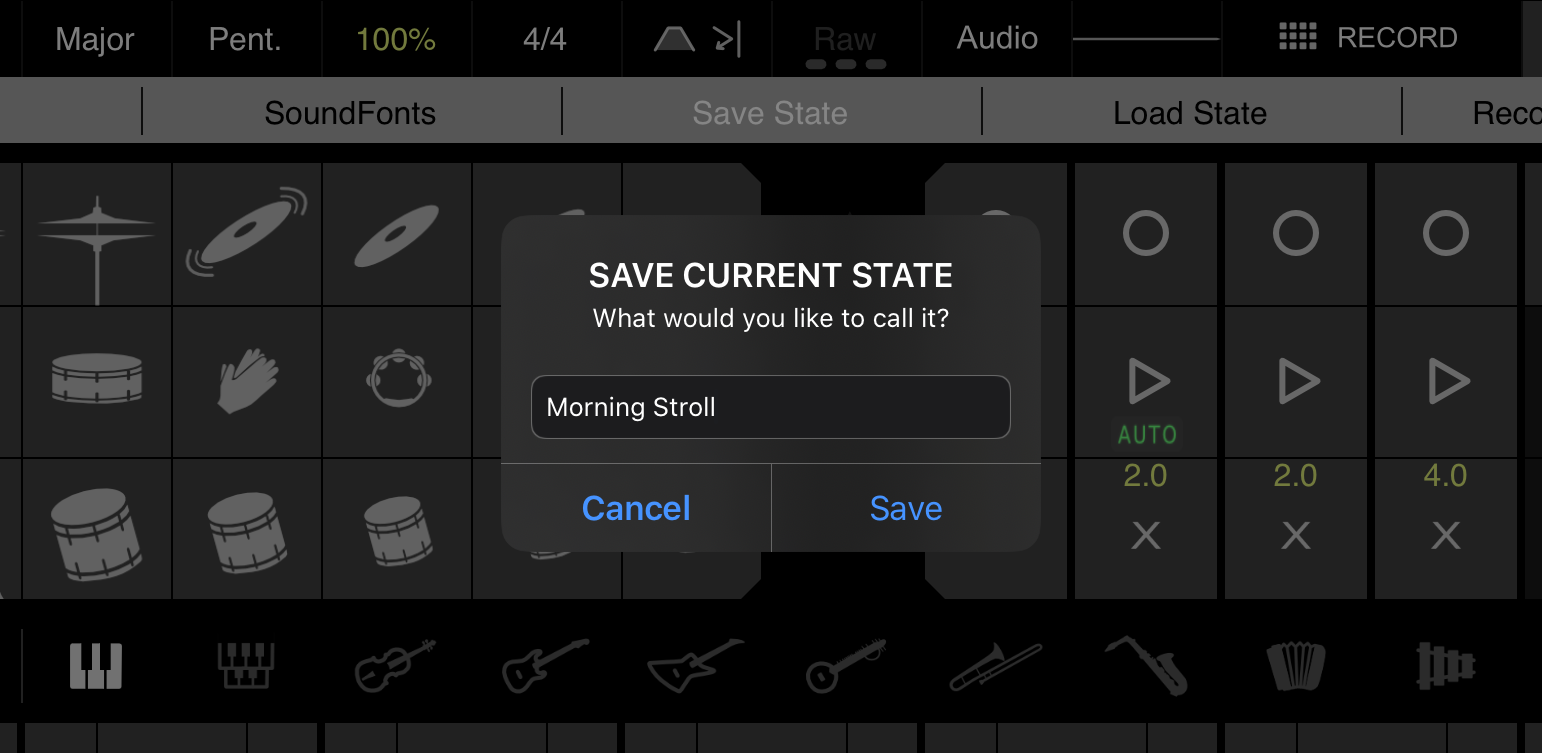
To save the current state of the instrument, tap on the file icon in the top section, then select Save.

To load a previously saved state, tap on the file icon and select Load. Note that the list of saved states in the load view indicates the key, scale, tempo, and number of note events contained within it.
State is also automatically saved after each recorded session, enabling you to pick up where you left off if you like a song and want to keep working on it.
SYNC / DOWNLOAD TO COMPUTER
Firo4 automatically backs up audio and MIDI session files when you sync your device with your computer.
All recorded session files are easily accessible via Finder or the iTunes/Music app. Each session has two files (.m4a audio file and .mid MIDI file) and is sorted by date.
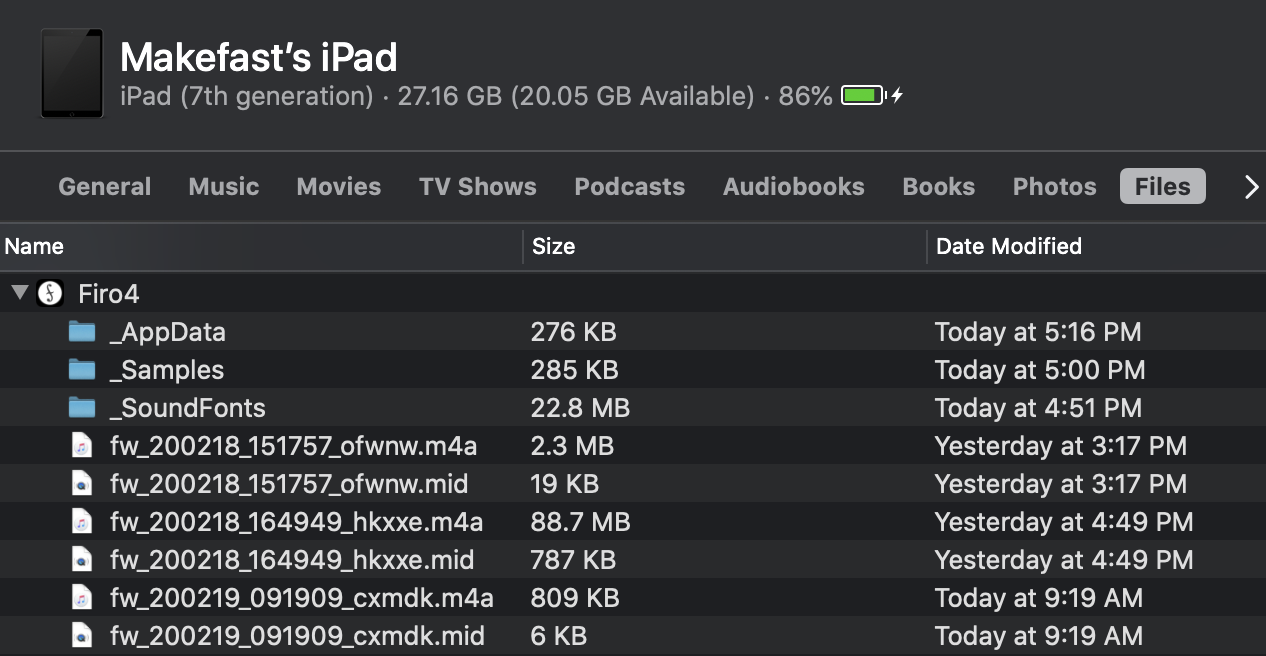
To access Firo4 files via Finder:
- Connect your device to the computer.
- Click on the device's drive/icon to show your device info.
- In the bar at the top, click on Files section.
- Click on the Firo4 app to see its saved data.
- You should see a list of all your session recordings. Drag them to copy to other locations/folders.
CONNECTING VIA MIDI / AUDIOBUS/ IAA
» MIDI Output
Firo4 includes support for direct audio connections to other applications and systems via MIDI and Audiobus. When these modes are enabled, Firo4 will play audio in the background.

To set up a MIDI connection, make sure you've enabled MIDI output at the top of the instrument. If you are outputting to other local MIDI apps, you should be all set.
If you want to output MIDI to external software on your laptop or desktop (such as a Digital Audio Workstation), then view the Fiddlewax Pro (Firo) MIDI guide for detailed instructions on how to connect your devices over WiFi or Bluetooth.
» Audiobus Output
Audiobus is enabled by default, so there's nothing within Firo4 that you need to turn on or setup. When Audiobus is connected, you will see the standard panel/indication on the right side of the instrument.
» Inter-App Audio Output
As of iOS 13, Inter-App Audio (IAA) is deprecated (meaning that Apple plans to no longer support it in future versions of iOS). But since many apps rely on IAA, we've left it in for now.
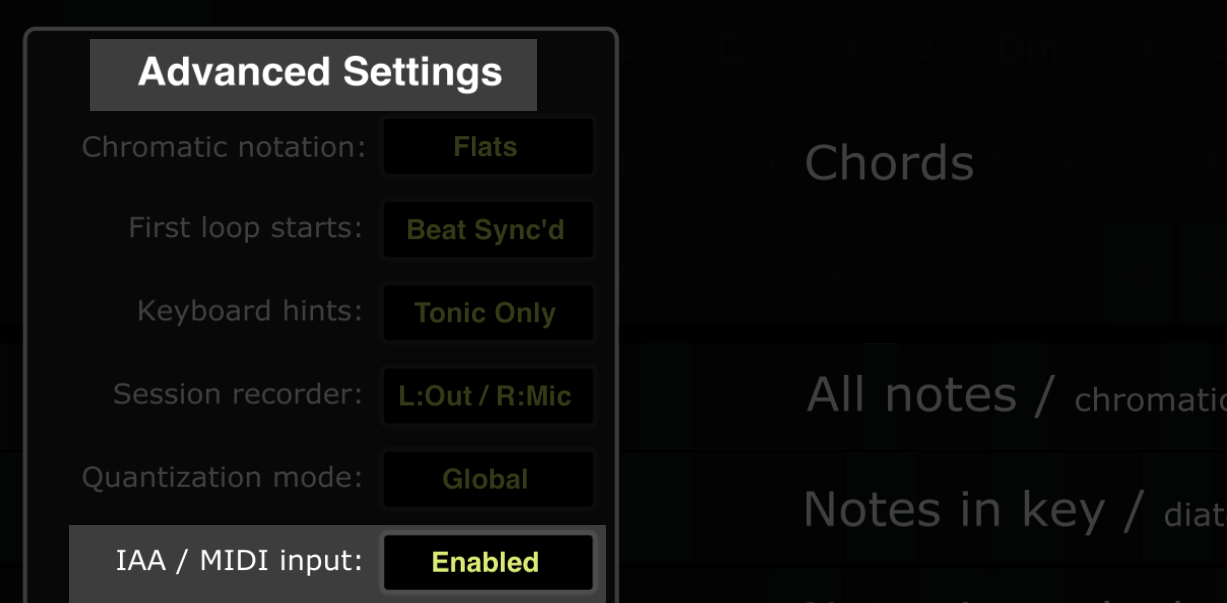
You'll need to explicitly tell Firo that you want to use IAA by enabling the "IAA / MIDI Input" mode in Advanced Settings. This ensures that Firo continues to run in the background while you switch between apps (as such, you should turn the mode off when you're done so the app doesn't continue to run when you aren't using it).
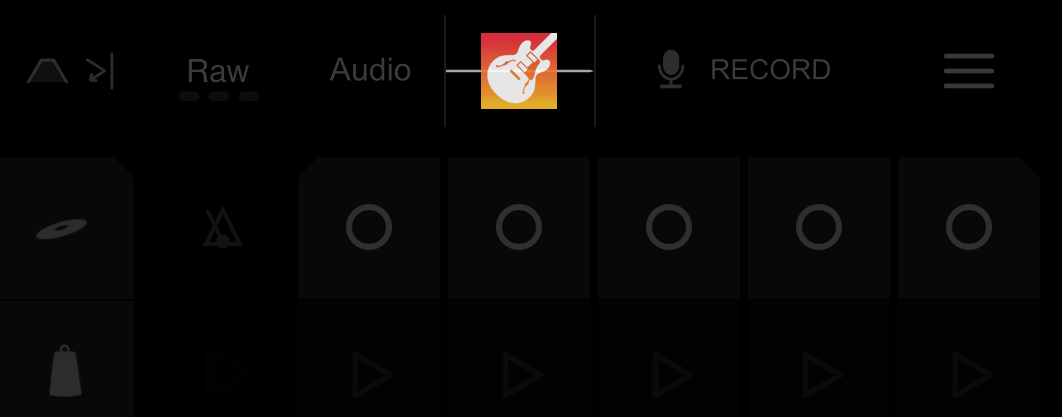
When Inter-App Audio is connected, you will see an indication in the top bar of the instrument with the connected app's icon.
In some cases, your app may be more easily found if it's already running, so if you're having issues seeing your app, start Firo4 and check again.
EXPERT MIDI CONTROLS
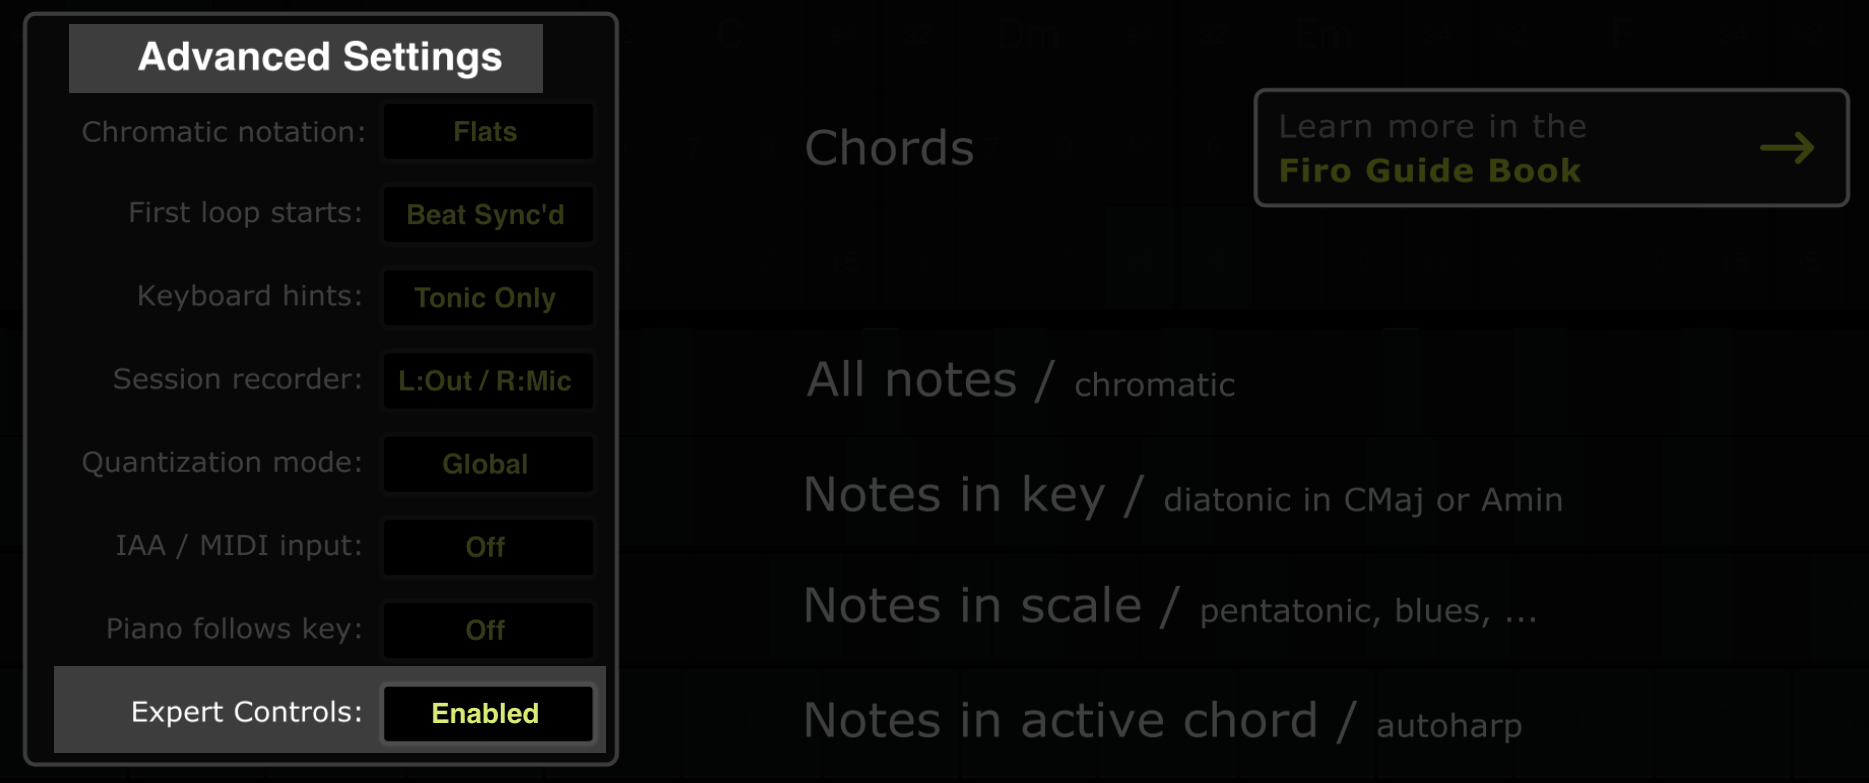
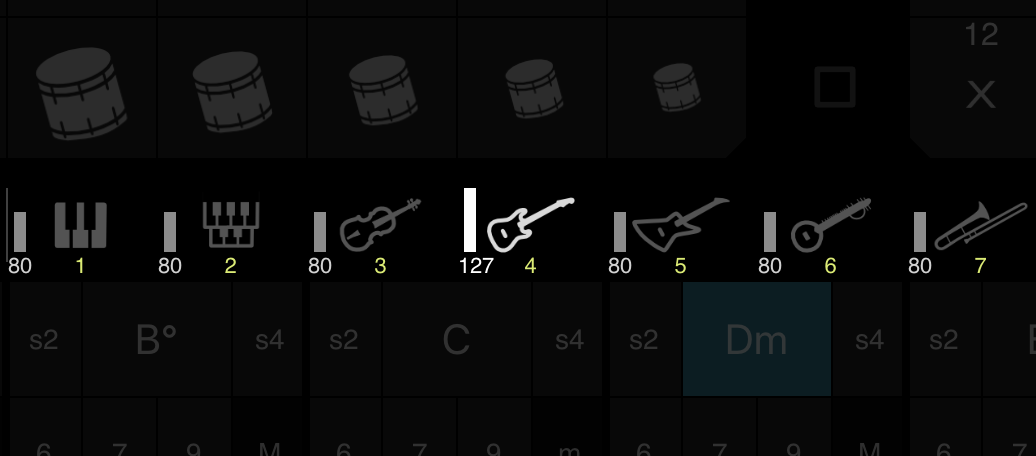
Firo4 includes an Expert Controls mode where the volume of each instrument channel can be controlled. To enable Expert Controls, toggle it via the Advanced Settings on the info overlay.
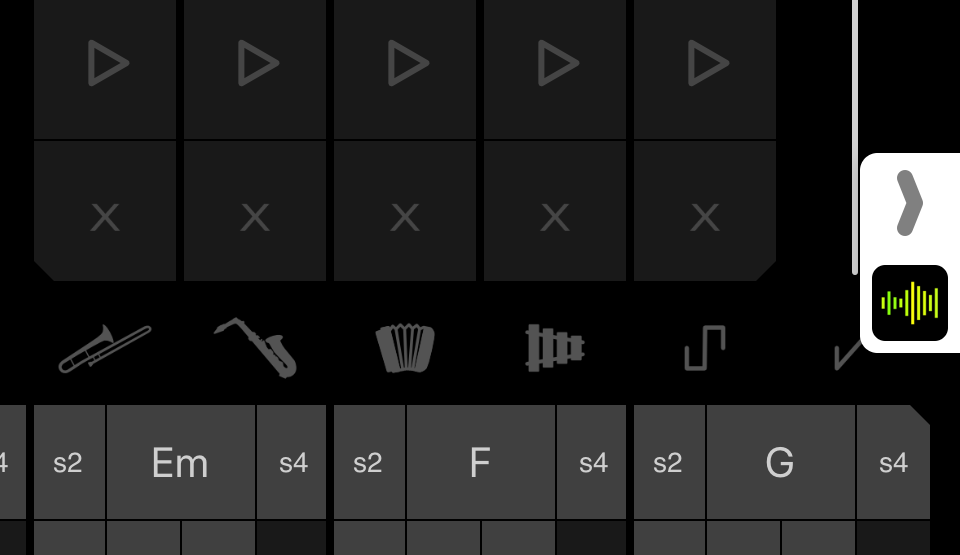
Once Expert Controls is enabled, you can adjust the volume of each MIDI channel separately by pressing and sliding vertically on each instrument selector. This also includes the drum channels (via the top selector) and the click track.
For example, here pressing and sliding up on the trombone instrument changes its volume to 127 (the max value for a MIDI channel's volume).
Note that when the channel volume is set to 0, MIDI events for that channel will not be sent to other connected MIDI apps and devices. This allows you to mute a channel, even if a remote application does not fully handle the MIDI channel volume control messages.
FEELING MUSICALLY STUCK?
How you make music is up to you, but if you're just getting started and feeling a little stuck, here are a few suggestions to get you going.
- Find music you like and try to understand why you like it. Maybe it's a subtle snare drum on the backbeat or a crunchy guitar bass line that draws you in. Whatever it is, experiment with some of those elements in your own songs to get out of a rut.
- Keep it simple. Most music starts from a very simple rhythm or melodic idea. Don't rush to add lots of additional instruments, loops, and harmonies.
- Learn some rhythms. Like any instrument, mastery takes practice. Search for example videos of drum patterns and work on exercises to build up your chops. Examples on YouTube.
- Learn about chord progressions. The Chords section of Firo4 makes playing chords simple, so building up an understanding of what chords and progressions do musically can help to give your song shape. More on Wikipedia.
- Add some effects. Changing how notes sound can have a big impact on what works well together and what you creatively choose to play next. Add in a filter or some reverb (via the Parameters at the top) and hear what happens.
- Give yourself constraints. Interesting styles and sounds often come from not being able to play something you would normally play. For example, a lot of rock melodies only use the pentatonic scale. Limit yourself to 3 drum samples, or 3 chords, or only 1 octave and see if that shakes things up.
- Think beyond the instrument. Firo4 can help you amplify your thoughts, but those thoughts likely come from other places. So take some time and listen to rain, walk down the street, or read a book. Get in touch with what moves you, then bring that energy back to the instrument.